Loading...
Loading...
Loading...
Loading...
Loading...
Loading...
Loading...
Loading...
Loading...
Loading...
Loading...
Loading...
Loading...
Loading...
Loading...
Loading...
Loading...
Loading...
Loading...
Loading...
Loading...
Loading...
Loading...
Loading...
Loading...
Loading...
Loading...
Loading...
Loading...
Loading...
Loading...
Loading...
Loading...
Loading...
Loading...
Loading...
Loading...
Loading...
Loading...
Loading...
Loading...
Loading...
Loading...
Loading...
Loading...
Loading...
Loading...
Loading...
Loading...
Loading...
Loading...
Loading...
Loading...
Loading...
Loading...
Loading...
Loading...
Loading...
Loading...
Loading...
Loading...
Loading...
Loading...
Loading...
Loading...
Loading...
Loading...
Loading...
Loading...
Loading...
Loading...
Loading...
Loading...
Loading...
Loading...
Loading...
Loading...
Loading...
Loading...
Loading...
Loading...
Loading...
Loading...
Loading...
Loading...
Loading...
Loading...
Loading...
Loading...
Loading...
Loading...
Loading...
Loading...
Loading...
Loading...
Loading...
Question Banks are used to organize collections of related questions that are to be used together on an exam form. They may be organized by competency, standard, topic, occupation, course, program or any grouping that best reflects your assessment needs.
The Assessments toolkit contains everything you need to assess your learners on any topic. It can be used to build everything from simple quizzes to high stakes exams tied to a competency framework. Results can be thoroughly analyzed with in-depth reporting and comparisons on question difficulty. Choose what level of feedback is offered to the learner after their attempt; ranging from no score given to detailed feedback on each question response and which competencies they've successfully proven.
How to access your system outside the live production environment
The sandbox environment is a safe, isolated space where users can explore features, test changes, and practice tasks without affecting real data or the live system. It's commonly used for demonstrations, training, experimentation, and staging for new upcoming versions.
To access your sandbox environment, follow these steps:
Visit the Shift iQ website at www.shiftiq.com
Click the Sign In link at the top of the page.
On the Sign In form, scroll to the bottom of the page.
You'll see an information message that reads, "You are signing in to the Production environment."
Below this, you'll see links to the other environments available to your organization. Typically, this includes Development and Sandbox.
Click the link for the Sandbox environment.
Copy the URL from your web browser's address bar.
For example:
Creating an Assessment Form involves a structured approach. Below, you’ll find a summary of the steps to follow in order to create your Assessment Form. This workflow will guide you through adding questions to your question bank, creating a clear specification for your assessment, and then using that specification to build a well-organized and effective Assessment Form.
Develop or Gather Questions: Start by creating or gathering all the potential questions you might want to include in the assessment. These could be based on a specific topic, skill, or criteria that the assessment is targeting.
Select the Assessment Toolkit from the Admin Home Page.
Select the Banks counter.
Search for the Bank you want to duplicate and select the bank in the Results panel.
Click on the Bank Name to open the Assessment.
When the Assessment bank is open, click on the
The JSON file will be downloaded to the Download folder on your computer.
Select the Assessment Toolkit from the Admin Home Page
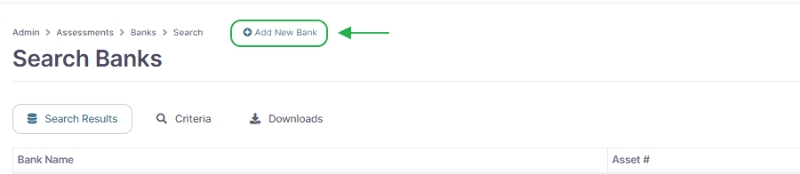
At the top of the page, select Add New Bank.
Select Upload one new bank from file from the dropdown menu at the top of the page.
Click on the magnifying glass icon () next to the Select and Upload Bank JSON File field and select the downloaded JSON file you want to upload.
Click the Save button.
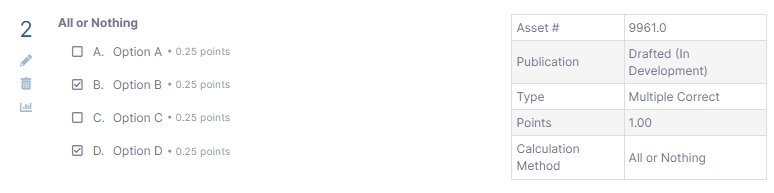
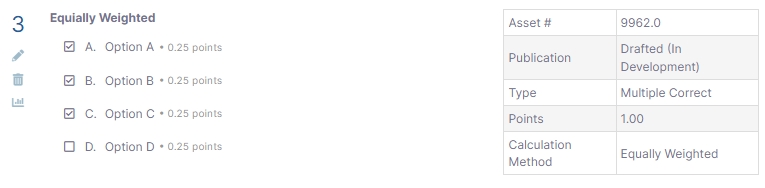
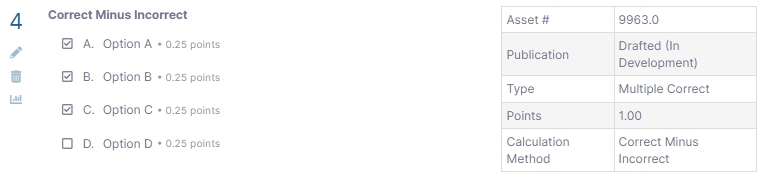
Question Types: Include various question types (e.g., Multiple Choice, Multiple Correct, True/False, Composed Response, or Likert scale).
Scoring System: Specify the scoring system for each question (e.g., 1 point for a correct answer, 0 points for an incorrect answer, etc.).
Organize the Questions: It’s helpful to organize questions into Sets based on the skills they assess.
Tagging: Tag questions with relevant keywords, such as competency code (e.g., A1, B2). This makes it easier to when building a specifications for your bank.
Choose your Specification Type:
Dynamic: A form with this specification does not have a fixed set of questions. If two learners start an attempt on this type of form, then each learner may be presented with a different set of questions and/or questions in a different sequence.
Static: A form with this specification has a fixed set of questions in a fixed sequence, which is determined by the author of the form. Every learner who starts an attempt on form with a Static specification sees exactly the same set of questions in exactly the same sequence.
Total Number of Questions: How many questions will be included in the assessment?
Set the Filter Type: Select how you want to filter questions for the Assessment Form.
Include All Questions: Include all of the questions in the set.
Question Tag Filter: Filter the questions in the set so that only those with matching tags are included.
Set your Question limit per Set: Specify how many questions from each Set in your question bank you want to add to your Form.
Weighting of Questions: If some questions are more important than others, decide how to weight them (e.g., certain questions might be worth more points or more time to answer).
Specify Conditions for Success: Define the thresholds or criteria for passing or success in the assessment. For instance, what score or percentage constitutes a passing grade?
Select Questions from the Question Bank: Depending on the specification you created in step 2, choose questions from the question bank that match the required criteria.
Set the Time Limit: How much time will be given to complete the assessment, if applicable.
Set Attempt Limit: This is the maximum number of times each person is permitted attempt this exam.
Include Instructions: Provide clear instructions at the start of the assessment form.
Publish the Form
Select the Assessment Toolkit from the Admin Home Page.
Select the Banks counter.
Search for the Bank you where you want to download the Set and select the bank on the Results tab.
Once Assessment bank is selected, click on the Question tab.
Click on the Download button and select # Shift iQ Markdown Outline (*.md)
The Markdonw (*.md) file will be downloaded to the Download folder on your computer.
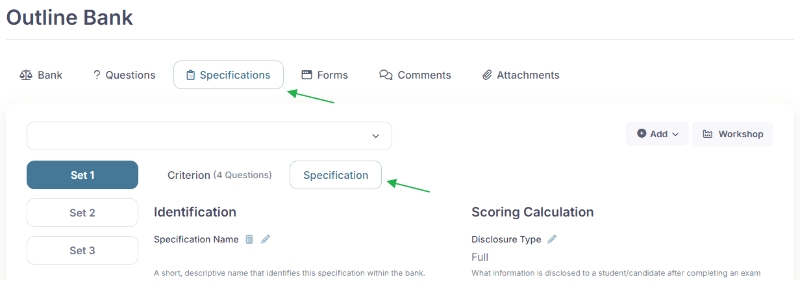
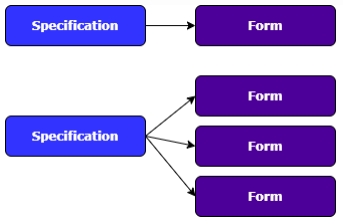
Specifications and Forms are used to control the organization and availability of exams to learners
Managing a contact's Roles and Permissions is a key part of an Administrator's job in Shift iQ. Here are some things to keep in mind when doing so.
Groups with the group type of Role are the only ones that can be configured with permissions to access any options on the Admin side of Shift iQ. They are also the ones that appear on the System Access tab
Every new contact
(The content is under revision. Check back soon.)
(The content is under revision. Check back soon.)
To add the Class Registration Tile to your Portal page, please contact your Shift iQ Account Representative to assist with the initial setup.
Select the Events toolkit on the Admin Home Page.
Each Specification can have one or more Forms. Forms are used to deliver the actual questions during the exam and control the availability of the exam.
Under the Specification tab select the Specification that you want to create the Form for.
Click on the Add button and select Form
Add a Form Name (This is the internal name used to uniquely identify this exam form for filing purposes)
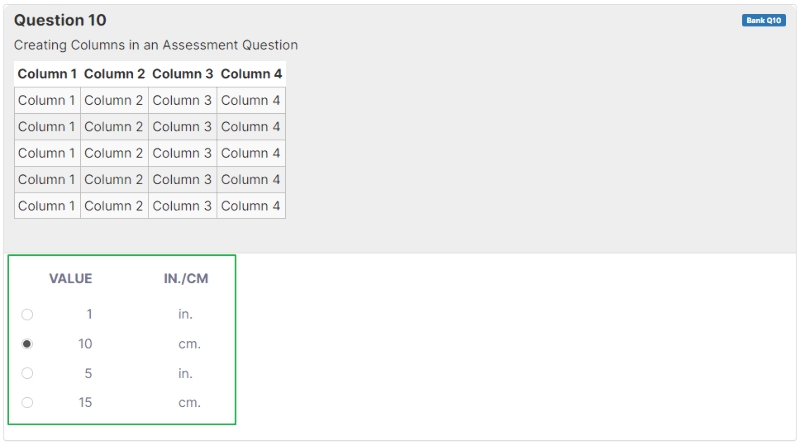
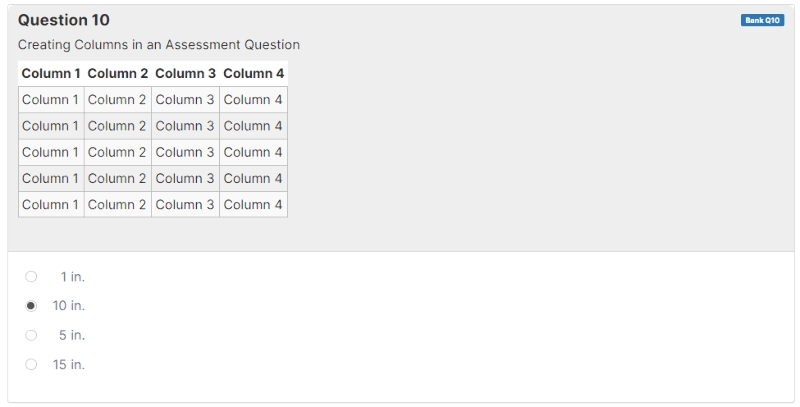
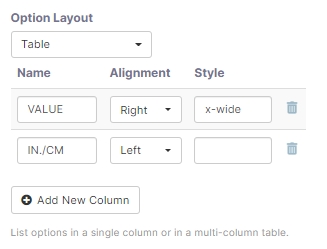
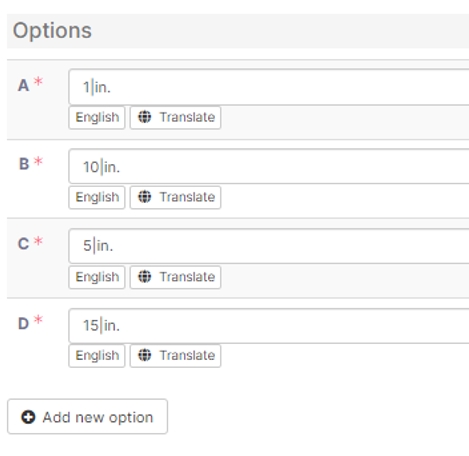
Columns can be created within an Assessment Question and the Answer Options. To add columns to the Assessment Question, use the below template/formula: Column 1 | Column 2 | Column 3 | Column 4--|--|--|--Column 1 | Column 2 | Column 3 | Column 4Column 1 | Column 2 | Column 3 | Column 4Column 1 | Column 2 | Column 3 | Column 4Column 1 | Column 2 | Column 3 | Column 4Column 1 | Column 2 | Column 3 | Column 4 *** Question will display as follow: To add columns in the Answer Options, use the | symbol to create the columns. Example: A. 1|in.B. 10|in.C. 5|in.D. 15|in. In the Settings Panel when editing a question, below Option Layout, select Table from the drop down menu. Click on the Add New Column button to create the columns. Select the Alignment (Left, Right or Center) and add the column Style. Select Save after changes were made. Style Options:
no-left-pad
no-right-pad
From the Admin Home Page, select Contacts toolkit.
In the Counters panel, click on People counter.
Click on Add New Person link to create/add a new contact (Top of the page).
Provide Basic Details for the new contact person. The following fields are Required Fields:
First Name
Last Name
To add Impersonation permissions, please contact an Shift iQ administrator by subitting a or emailing .
Administrator Note: When adding the Impersonate permission for an administrative user, it can only be added when you are logged into the Organization account that requires this permission.
Log into the Organization account that the Impersonate permission needs to be added to
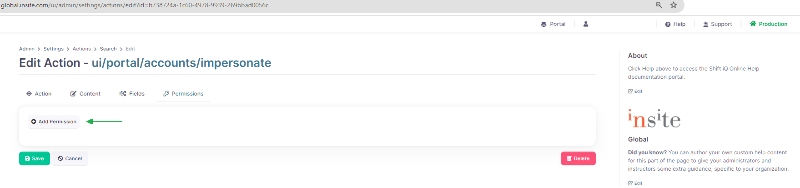
On the Admin Home Page, select Settings Toolkit
Select the Actions counter and under the Criteria tab search for Action URL = impersonate Click on the Action URL (ui/portal/identity/impersonate)
Under the Permissions
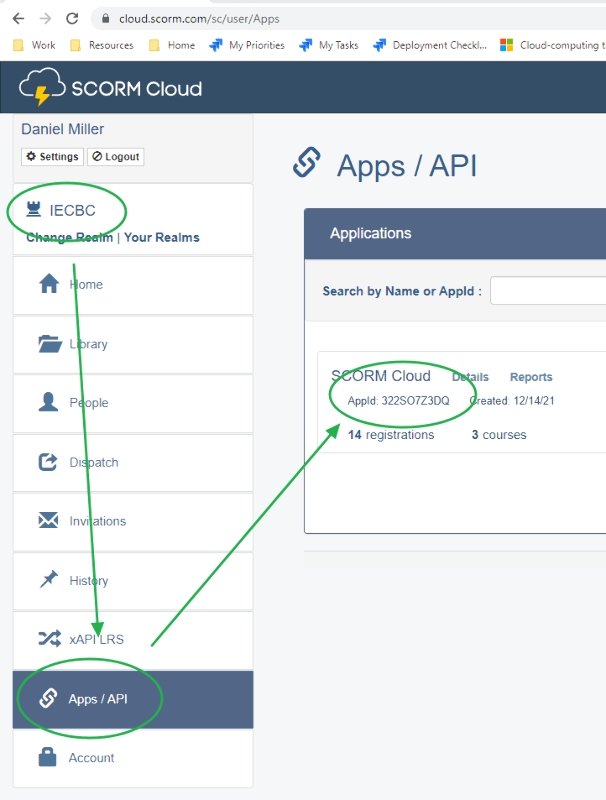
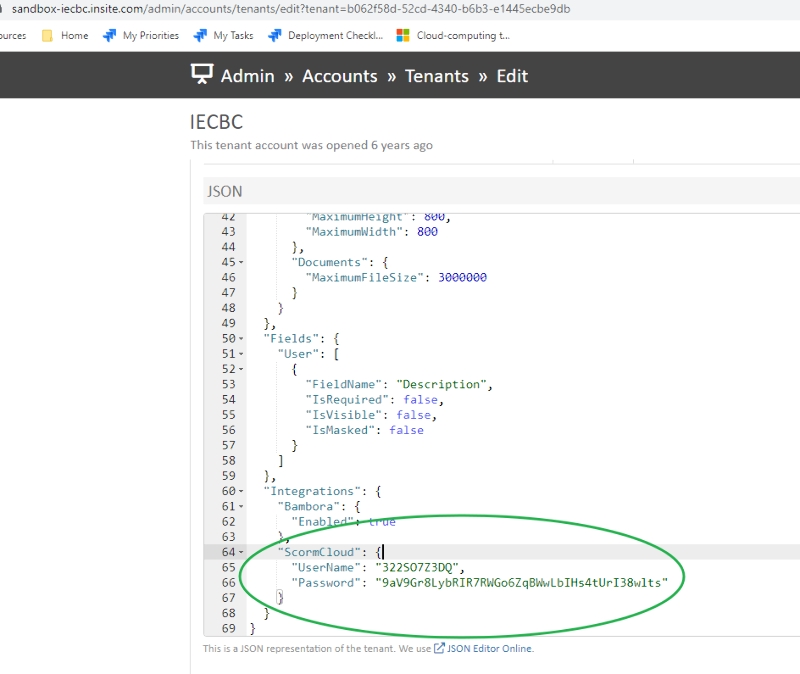
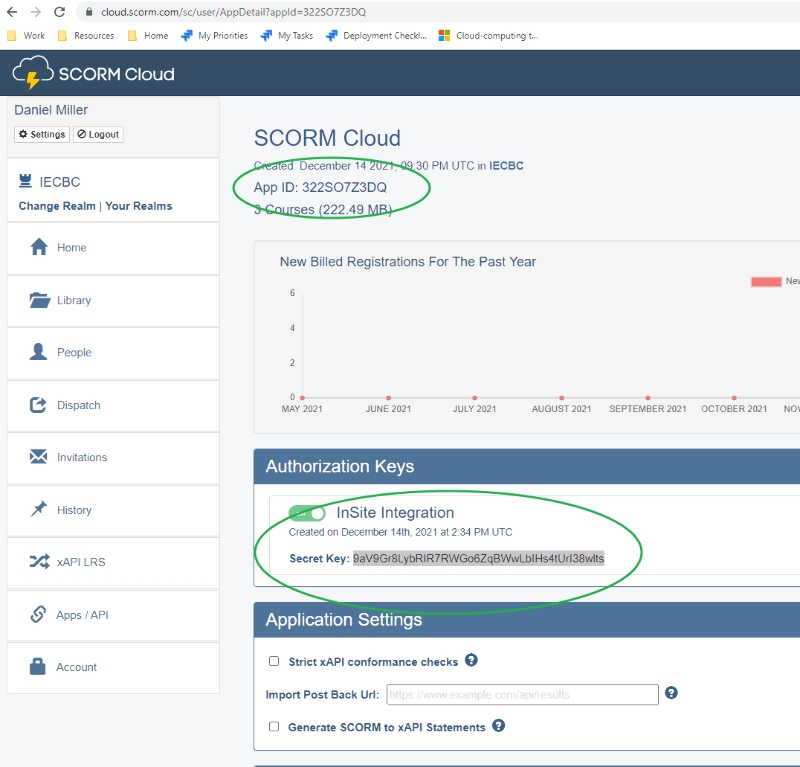
First, find the SCORM Cloud AppId for the tenant. This is in the SCORM Cloud control panel here:
Next, find the Secret Key assigned to the SCORM Cloud App by clicking on Details. You’ll find this here:
Finally, use the AppId and the Secret Key for your UserName and Password settings here:
How to change the content font color for an entire Course:
In the Course, select the Course Setup tab
Under the Style tab, add the following text in the Cascading Style Sheet (CSS) Rules field: <style type='text/css'>.lesson { color: black; }</style>
You can change the color by typing the color name (e.g. black, red, blue) or adding the HTML color code (e.g. #060606, #F90F0F, #0F0FF9) behind color: Example: color: blue / color: #060606
Safe Exam Browser is a web browser environment to carry out e-assessments safely. The software turns any computer temporarily into a secure workstation. It controls access to resources like system functions, other websites and applications and prevents unauthorized resources being used during an exam.
To download Safe Exam Browser please visit
Please Note: Safe Exam Browser is an open source software that was not developed by InSite Information Systems. Support is familier with its basic functionality and we can answer some questions, but for most requests we advise using the Safe Exam Browswer help documentation found here
Before reporting an exam issue to Shift iQ support, gather the below information:
Provide detailed description of the issue that is happening.
Confirm if the venue tested the internet connection on the device that is having the issue. If the issue is only happening to ONE person in the class, it is an indication that it is a possible venue issue and not a Shift iQ issue. If there was an issue with Shift iQ, it will affect ALL candidates and not just one candidate.
Ask for the Venue’s IP Address. The Venue can open and provide their IPv4 address.
Privacy settings can be applied to a course to restrict access to specific users or groups, ensuring that only authorized individuals can view or participate in the course content.
In the Course click on the Course Setup tab, then the Privacy Settings tab.
Click on the Plus icon () under the Groups heading.
Search for the
Open the Assessment you wish to Review.
Under the Forms Tab, you can review the following:
Questions Tab: Ensure the exam form contains the correct question items.
Section Tab Settings: You can add a Title and Summary to your Form page. The information conent you add here will appear at the top of the Assessment Form.
When an Assessment Attempt is submitted, the system automatically Analyzes a users attempt. During the Analyze process, the following occurs:
Sets final score, i.e. Pass or Fail.
Sets attempt tag from Venue Location Name (if being used).
Updates comments in Assessment from Attempt (if comments for learners are enabled).
Add a Code (This is the form's catalog code. It defaults to N/A. Can be left as is unless a specific identifier is desired)
Add a Source (Reference to the source of the content and/or configuration for this form. Can enter one if available.) - Optional
Add Origin (Identifies the originating platform and/or record for this form. When this property is used, it should ideally contain a fully qualified URL or API path.) - Optional
Add a Time Limit (This is the number of minutes allowed for each attempt on the exam. Enter time limit in minutes)
Select the Criteira (Sets) you want included in the Form.
Under Like Item Groups, select if you want the questions to be Mutually Exclusive or Not Mutually Exclusive to the Form you are creating.
Click the Next button.
All the questions that will be included in the form will be listed under Preview Questions.
Click the Save button to create the Form.
Add the Question Set name in the Set Name field.
Under Upload Question Items select Shift iQ Markdown in the File Format field.
In the Upload Shift iQ Markdown field click on the Folder icon () and slect the Markdown file you want to upload. The file format can be a Text file (.txt) or a Markdown file (.md).
Download an example here: Shift iQ Markdown Sample
Click on the Upload icon () to your *.txt or *.md file.
After uploading your file, you will see a preview of the questions being uploaded. If it is not the correct question you uploaded, click the Clear Questions button to select another file. To save your upload, click the Save button.
Note: When uploading questions only Question Type = Multiple Choice can be created.
Select the Assessment Toolkit from the Admin Home Page.
Select the Banks counter.
Search for the Bank you where you want to uplaod the Set and select the bank in the Results tab.
Once Assessment bank is selected, click on the Question tab.
Click on the Add button and select Set.
Add the Question Set name in the Set Name field.
Under Upload Question Items select LXR Merge in the File Format field.
In the Upload Shift iQ Markdown field click on the Folder icon () and slect the LXR Merge file (*.lxrmerge) you want to upload.
Download an example here: LXR Merge Fromat Sample
Click on the Upload icon () upload your *.lxrmerge file.
After uploading your file, you will see a preview of the questions being uploaded. If it is not the correct question you uploaded, click the Clear Questions button to select another file. To save your upload, click the Save button.
Select the checkbox next to User Access Granted to grant access to the user you are adding. An Temporary Password will automatically be generated for the user to use for their first login. A user will be required to change this password the first time they sign in.
Select the permission list to which you want to assign this new user account.
Click Save to save the new contact.
Once a new user has been added, an Welcome Email will automatically be sent to the user with their Login Name and Temporary Password. The user will be required to update their password when they login for the first time.
If the user does not receive the Welome Email, you can resend the Welcome Email to the user by searching for the user (see Searching Contacts) and click on System Access tab. Click on the Send Email button and select Welcome. On the Send Email screen, select the Shift iQ Alerts (Mailgun) sender and review the information in the content field. You are able to make changes to the content if needed, then click the Next button. You will be redirected to the Confirm screen to review the message that will be sent to the user. Click Confirm to send the message.
Please Note: If the contact record was created 72 hours prior to sending the Welcome Email, you would need to do a Password Reset before sending the Welcome Email.
Content Tab: Edit the Title and Sumamary of the Form. You can alos specify if a Diagram book or Reference Materials for Online Sessions is included in the From.
Addendum
Summaries Tab: Provides the summaries of the Taxonomies, Standards (GAC), Standards (Competency), Dificulties and Tags assigned to the Form.
Saves scores to the gradebook (if an Gradebook is attached to the Assessment Bank and Form).
Assessment Attempts with Composed Essay question types need to be Graded by an administrator after the user submits their Assessment Attempt. After grading the Composed Essay questions, the administrator needs to click the Analyze button to instruct the system to go through Analyze steps mentioned above.
When doing a Force Complete for an uncompleted Assessment Attempt, an Administrator can click the Analyze button to instruct the system to go throught the analyze process.
Only users added into the selected Group(s) will be able to access this course once it has been published to the Portal.
Click the Save button.
Find the User you want to add/remove/review Access Control or Role Settings (see Searching Contacts).
Click on the System Access tab and then under the Sign In tab you can review the User Credentials, Access Control and Roles assigned to a user.
Credentials:
Password Expiry: We HIGHLY recommend that you set user’s passwords to expire every 6 months at a maximum. If a user’s password expires, they will be required to enter a new password the next time they log in. Licensed: The Licensed checkbox shows whether or not the user has agreed to the terms and conditions of use (pop-up box that appears with first login)
Impersonate the User:
Login under an admin account, search for the user you would like to impersonate.
Click on the System Access tab and then under the Sign In tab you can click on the Impersonate User button.
The session will be automatically routed to being logged in as that user whom you would like to impersonate.
Once you’re done checking for functionality and access of the user, you have to Stop Impersonating the user, by clicking on your name in the Menu bar.
Reset Password:
Login under an admin account, search for the user that is requesting a password reset.
Click on the System Access tab and then under the Sign In tab click on the Reset Password button.
This will autogenerate the password and its confirmation. Save the Password and communicate the new password to the user.
Access Control:
Access Granted: The Approved checkbox turns that person’s account on
Two Step authentication:
Two-step verification is a process that involves two authentication methods performed one after the other to verify that someone or something requesting access is who or what they are declared to be.
Optional: Allow user to choose between enabling, disabling multi-factor authentication.
Mandatory: Forces user to activate multi-factor authentication upon next successful login.
Current MFA Mode: Displays the current MFA selected.
Roles:
Every Organization is responsible for ‘cataloging users’ within a system so that everyone who has access to it can be properly authenticated
It is important for better access control that the roles of identities are clear and allow easy identification of the individual who wants to access them.
Static Specifications can be used to generate exam Forms. This allows administrators to specific which questions should be on the Assessment Form.
Select Add under the Specifications panel.
Choose Static as the Specification Type
Specification Types:
Static (Fixed identically for all attempts): A form with this specification has a fixed set of questions in a fixed sequence, which is determined by the author of the form. Every learner who starts an attempt on form with a Static specification sees exactly the same set of questions in exactly the same sequence.
Dynamic ( Generated randomly per attempt): A form with this specification does not have a fixed set of questions. If two learners start an attempt on this type of form, then each learner may be presented with a different set of questions and/or questions in a different sequence.
Create a Specification Name
Select an optional Consequence Type (high, medium, low). Indicates the stakes for exam forms following this specification.
Enter an From Limit on the maximum number of forms that can be generated based on this specification.
Enter an Question Item Limit on the maximum number of questions allowed on each exam.
Select the Disclosure Type (None, Partial, Full). This selection affects the information learners receive about their performance on the exam when it’s submitted. Full is best practice for exams with multiple forms and randomized questions. For non-randomized exams; not a good idea for full disclosure, use partial.
Enter a Passing Score (%), the minimum score required to pass the exam.
Enter an Weight on Success (%) - If the student/candidate passes the exam, what weight is applied to the submission score?
Enter an Weight on Failure (%) - If the student/candidate fails the exam, what weight is applied to the submission score?
Select one or more Question Sets you would like to include.
Click Save
(The content is under revision. Check back soon.)
Once the Specification has been created, you can apply filtering criteria to refine which questions are displayed on the exam Form. Filtering criteria can be applied to all questions or to each question set in the bank.
Navigate to the Specification Panel and click on Add Criteria.
Select the Question Set to which this criteria applies. Questions that match the criteria here will become available to include on forms.
Select the Filter Type:
Include All Questions: All questions from the question set will be included in the form, up to the question item limit indicated (Ex. A set with 12 questions and a limit of 6 would select 6 questions from this set)
Question Tag Filter: Tags applied to questions in the bank can be used to refine the questions selected.(Ex “t1:1” means select one question with the tag “t1” from this set)
Pivot Table Filter. This feature will allow for questions to be selected across several criteria (Ex. Questions that are aligned to a particular competency AND of a certain difficulty)
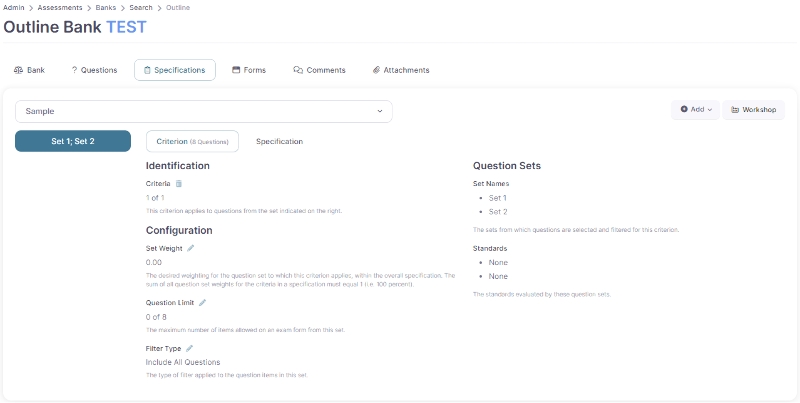
Configure Question Set Weight. The desired weighting for the question set to which this criterion applies, within the overall specification. The sum of all question set weights for the criteria in a specification must equal 1 (i.e. 100 percent).
Confiqure Question Item Limit. The maximum number of question items allowed on an exam form from this question set.
Click on Save
Important Note: The Set Weight stores the value entered by an administrator in GAC % column on Workshop page and helps calculate the values for the Pivot Table Filter, and then the Pivot Table Filter will determine the set number of questions on the form. In other words, the Set Weight only makes sense when the Filter Type in the Specification is set to Filter with Pivot Table.
The Set Weight is not used in question filtering, even when Filter Type is Filter with Pivot Table. The Pivot Table Filter only applies to the questions filter while the Set Weight is only used to store the value that was used to calculate the Pivot Table Filter values.
The value in the Question Limit only affects the set of form questions when the Filter Type is set to Include All Questions. Set Weight is not applicable and has no effect on the creation, delivery, or marking of the form if the Filter Type is set to Include All Questions.
Once the Specification has been completed, proceed to creating a Form.
Specification: Set of rules that questions adhere to. Form: How the questions are displayed.
Note that some of the options below are only available to admins with Write and Delete access.
On the Admin Home Page, select Contacts Toolkit.
Select Groups counter under Contact Groups heading.
Search for the group you would would like to Edit or Delete.
To edit, click on the Edit icon (Pencil icon ) and to delete click on the Delete icon (Trash Can icon ).
A group can also be deleted by selecting the group you would like delete and click on the Delete button at the bottom of the page.
If changes were made in a group, please remember to Save your changes
Under the Forms tab click on the Add button and select Questions or Add Existing Questions
Below Question Items use the checkboxes to select available question to add.
Click Save
needs more details, maybe links to adding attachments, edit questions, other content?
You can view as little or as much information as you want on the search results page such as:
Criteria: First Name, Last Name, Match Exact Spelling or Similar Pronunciation, Contact Code, Comments Email: Email Address, Email Enabled or Disabled, Email Validity Employment: District, Employer, Job Title Status: Membership Status, User Status, Password Status, Archive Status, Multi-Tenancy, Tenant Role Address: Address Type, Country, Province, City Groups: Group Name, Include/ Exclude Group Time Stamps: Created After, Created Before, Modified After, Modified Before
Settings: You can also adjust the ‘settings’ and add or modify existing filters for the search criteria section to create a New Saved Filter
Filter: You can specify one filter for each search operation, but the filter itself can include multiple fields, multiple criteria
Clear: The filters should be cleared, as your new search term maybe for something entirely different from the original search query.
Go into Contacts toolkit and under the Downloads panel you are able to download your contact list.
The download function will download all information of the contacts, not just the columns visible in the search results. You are able to customize your download by selecting which columns you want visible.
Downloads are available in .xlsx or .csv formats.
Create engaging content for your learners. Courses can contain lessons, surveys, assessments, pictures, videos, SCORM packages and more. Additional or alternative content can be triggered based on permission settings.
(The content is under revision. Check back soon.)
Groups in the Contacts toolkit can be used to set access permissions for the Classes published on the Portal. If no Groups have been created or new groups are required, it can be added in the Contacts toolkit, using Groups (See Create a New Group).
Under the Privacy tab click on the Pencil Icon () next to the Groups field.
In the Filter card, select the Group Type (Department, District, Employer, List, Role, Team, Venue) and then in the Update Groups card select the groups that are allowed to the see the Class on the Portal.
Click the Save button to save your changes.
Note: You are able to give permissions to different Group Types for the same Folder/Page. e.g. A combination of Groups withing a Role and within a List can be added to the permission list of a Foler/Page.
By setting Prerquisites in a course, Learners must satisfy these prerequisites before the activity is available to start.
Prerequisites that can be selected:
Acitivity Completed
Select the Lesson you require the Learner to complete before the activity is availalbe to start.
Assessmnet Passes
Select the Assessment Form the user needs to pass before the activity is available to start.
Assessment Failed
Select the Assessment Form the user needs to pass before the activity is available to start.
Assessment Scored
Select the Assessment Form and set score range the user needs to achieve before the activity is available to start.
Question Answered Correctly
Select the Question Bank and Question the learner needs answer correctly before the activity is available to start.
Question Answered Incorrectly
Select the Question Bank and Question the learner needs answer incorrectly before the activity is available to start.
Grade Item Passed
Grade Item Failed
The Contacts tool kit is where you can create and edit all the contacts and groups that exist for your organization. Contacts can be Users (your customers), who only have access to a portal, or Administrators (your coworkers), who have access to create and edit content for your Users. Permissions are also controlled here, using Group membership. Contacts can have Membership in multiple Groups; allowing for intricate relationship management and reporting.
We are working on a new feature that will simplify the process of converting a Microsoft Word document into a Shift iQ lesson, using a utility called Pandoc.
Attached is a simple prototype for a new Microsoft Word document template that content authors can use to take advantage of this new functionality.
(The content is under revision. Check back soon.)
(The content is under revision. Check back soon.)
When you are ready to Publish your Class to the user Portal, search for the Class you created and under the Class Setup tab, click on the Publish button.
Select the Registration Start date (The date and time when registration for this event is open, after which new registrations are permitted) and Registration Deadline date (The date and time when registration for this event is closed, after which no new registrations are permitted.).
Note: The Registration Start and Registration Deadline dates controls when the Self-Register and Register Employees buttons appear on the Class Outline page.
The Register Employees button can be added/removed by Organization specific settings. Please ask your Shift iQ Account Representative if you need to add/remove this button.
Click the Publish button.
Select the Courses Toolkit on the Admin Home Page and then select Courses counter at the top of the page.
Click on Add New Course link at the top of the page.
In the Course-Creation Tool field, select one of the following option from the dropdown list: One new course: Used to create a new course. Upload one new course shell from a file: Used to upload the shell from an existing course.
Add the Course Name.
Select Save.
(The content is under revision. Check back soon.)
Users are able to lookup specific groups that were created by going to the Contacts Toolkit on the Admin Home Page, and selecting Groups under Counters panel.
Groups can be looked up using different search Criteria like Groups Name, Group Type (Employer, List, Organisation, Role, Venue) or Group Label. The information used to create the group will determine the Criteria used to search for a group.
Settings: You can also adjust the ‘settings’ and add or modify existing filters for the search criteria section to create a New Saved Filter Filter: You can specify one filter for each search operation, but the filter itself can include multiple fields, multiple criteria Clear: The filters should be cleared, as your new search term maybe for something entirely different from the original search query.
small-right-pad
small-left-pad
x-wide
The Answer Options will display as follow: Names can be added to the columns in the Answer Options by adding the headings in the Name field under Option Layout.
It will display the headings as follow: To create wider columns, add the Style option x-wide It will display the columns as follow:
Select the Group within the Organization that you would like to give this permission to and select Save
Click Save.
Please note: Adding this code to the Course Style will change the color for all content in the Course. However, if there are Assessments or Surveys attached to the Course the font color for those items will not change as those are pulling data from a different toolkit.
Confirm the version of SEB that venue is using. The current supported versions of SEB: SEB 3.3.2 up to SEB 3.7.0 This can change, and updates can be found here: https://safeexambrowser.org/download_releases_en.html Venues can see their version installed on the exam login page.
Shift iQ records the SEB version used by a user after they login to their exam. An administrator can view the SEB versions in the following places: i. If using Exam Events, open the event and click on the Grades tab, under the Exam Events Tab. The SEB version will be displayed below the learner's name under the Exam Candidate column. ii. In Assessment Attempts, the SEB version will be displayed below the learner's name under the Exam Candidate column.
Question Banks are used to organize collections of related questions that are to be used together on an exam form. They may be organized by competency, standard, topic, occupation, course, program or any grouping that best reflects your assessment needs.
Select Assessments Toolkit on the portal homepage and then select the Banks Counter.
At the top of the Search Banks page, click on Add New Bank.
From the dropdown menu at the top of the page you are able to select one of the following options:
One new bank: Create a brand new Assessment Bank from the beginning.
Duplicate copy of existing bank: If you have an existing Assessment Bank you wan to use as your framework, you can duplicate the existing bank.
Upload one new bank from file: Assessment banks can by uploaded by using a JSON File
If you selected to create One new bank, complete the following fields:
Bank Type: In the Bank Type Field, Advanced is preselected as this is the only option currently available.
Add Bank Title (Required Field): A descriptive user-friendly title for the bank.
Add Bank Name (Required Field): A short name that identifies the bank internally for filing purposes.
Select the Level Type (Optional): Certificate of Qualification, Endorsement Exam, Foundation Exam, Interprovincial Standard Exam, Standard Level Exam.
If you selected to create a Duplicate copy of existing bank, complete the following fields:
Bank: Select the Bank from the dropdown list that you want to duplicate.
Bank Type: In the Bank Type Field, Advanced is preselected as this is the only option currently available.
Add Bank Title (Required Field): A descriptive user-friendly title for the bank.
Add Bank Name (Required Field): A short name that identifies the bank internally for filing purposes.
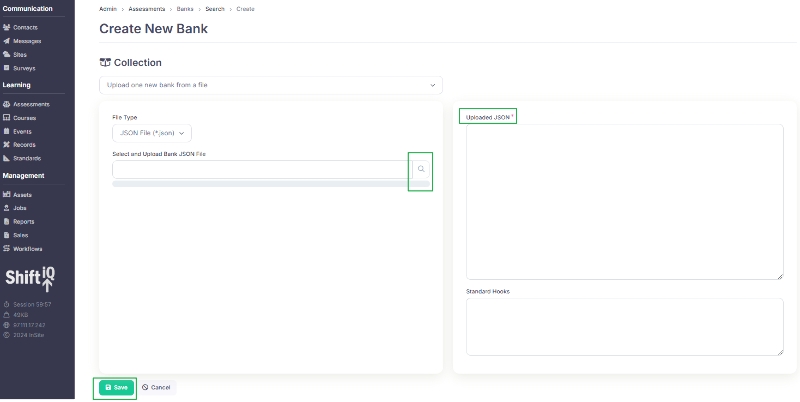
If you selected to Upload one new bank from file, complete the following fields:
Click on the Magnifying Glass icon next to the Select and Upload Bank JSON File field and select the JSON file.
Once file is selected, it the content of the JSON file will be displayed in the Uploaded JSON field.
Select the Save button for the Assessment Bank to be uploaded and created.
The Bank has now been created and details for the bank will be displayed under the Bank tab of the Assessment. Changes can be made to editable fields on this page.
Standards: The formal standard evaluated by questions in the bank
Bank Name: The name that uniquely identifies the bank for internal filing purposes
Level: The type and number for a discrete skill level
Edition: The edition of this bank (e.g. Year and Month)
An Administrator can Pre-Publish an Assessment Form for testing purposes. You will be able to complete the Assessment Form and submit your attempt.
Pre-Publishing an Assessment:
In the Question Bank, select the Forms tab.
If you have multiple Assessment Forms for the same Assessment Bank, select the From you want to Pre-Publish from the dropdown list at the top of the Form page.
Click on Action button and select Prepublish.
On the Pre-Publish page, you will see a URL on the right side, under the Start an exam attempt heading. Click on the URL to start your attempt.
The Pre-Publish URL is for Administrator Access Only. This link is strictly for administrative testing and review of the assessment form. Distribution to, or use by, actual assessment takers is NOT advised. Any assessment attempts completed using this link are considered to be tests and are NOT recorded by the system.
The system does not keep attempts for Forms that has an Publication Status = Drafted. If an attempt is submitted, while the form has an Publication Status = Drafted, the last thing the learner's session does is clean up after itself by deleting the attempt. There will be no record of the Pre-Published attempt. If you want to have a record of a Published attempt, then you should publish the Assessment Form as a Standalone Assessment on the Portal. (See )
See below the steps to generate a PDF document that lists all the questions in an Assessment Bank, including comments by administrators.
On the Admin Home page, select the Assessments toolkit and then click the Banks counter.
Select the Criteria tab and search for the Bank Name or Bank Title and click the Search button.
In the Results tab, click on the Bank Name of the Assessment you want to open.
Under the Bank tab, click on the Print button.
Under Settings (Print Settings) check the boxes “Include Images” and “Include Admin Comments”.
At the bottom of the Print Form page, there are 3 print options available:
Print Images - A PDF download containing all the Images in the Assessment Bank.
All Images
Addendum Images
Print Form (internal) - A PDF download containing all the Questions in the Bank, including administrator comments.
See below the steps to generate a PDF document that lists all the questions in an Assessment Form, including comments by administrators.
On the Admin Home page, select the Assessments toolkit and then click the Banks counter.
Select the Criteria tab and search for the Bank Name or Bank Title and click the Search button.
In the Results tab, click on the Bank Name of the Assessment you want to open.
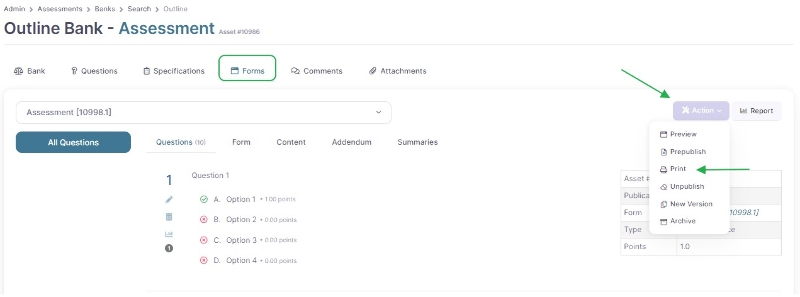
Select the Form tab, click the arrow next to the Action button and select Print.
Under Print Options (Print Settings) check the boxes “Include Images” and “Include Admin Comments”.
At the bottom of the Print Form page, there are 4 print options available:
Print Form - A PDF download containing all the Questions in the Form.
Print Addendum - A PDF download containing all the Addemdums attached to the Assessment Form.
Print Form (internal) - A PDF download containing all the questions in the Form, including administrator comments.
Print Form (compact) - A PDF download containing all the answers to the Questions in the Form.
Important Note: The Print Form button will be disabled if the Form created does not contain any Sections (Sets).
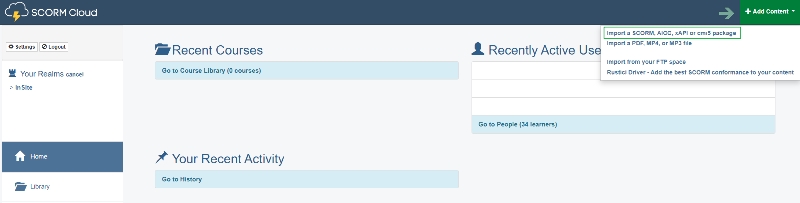
Login to https://cloud.scorm.com/sc/guest/SignInForm
Select the Tenant (Realm) you want to upload a SCORM course for.
Click on Add Content (Top Right Corner) and select Import a SCORM, AICC, xAPI or cmi5 package.
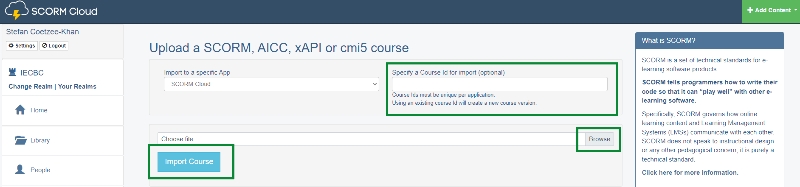
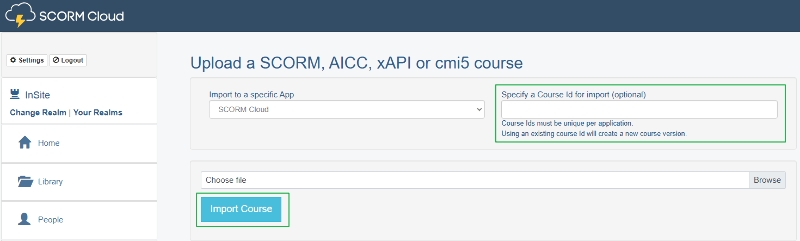
Specify a Course ID for the file you are uploading (e.g. Planning-for-Your-Future-V1), then choose the SCORM or xAPI file you wish to upload by clicking on Browse. Once file has been selected, click Import Course.
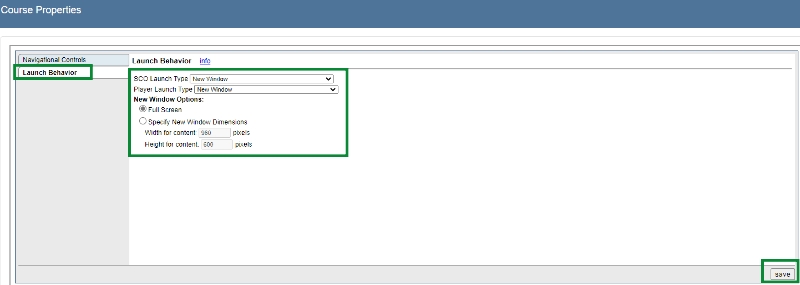
Once the course has been uploaded, you are able to change the Lauch behaviour in Course Properties. After your changes has been made, click Save.
The Course ID (e.g. Planning-for-Your-Future-V1) is what you use as:
Admins can perform advanced searches in the Questions tab by using advanced search syntax. (The syntax here follows the same convention that Google uses for its advanced search.)
Under the Question tab, in the filter field at the top of the page, add the parameter:value and click the filter button. The results will bring up all questions in the bank with the enetered parameter:value.
If "parameter" is not included in the filter field, then the Parameter="keyword" is assumed.
code
Code
Please note: Tabs can only be enabled if the Specification Type is set to Static. Tabs cannot be enabled if the Specification Type is set to Dynamic.
When an Assessment Form is created, question on the form can be presented in 2 ways to a learner:
All questions in the Form is displayed on one page (default behaviour): This is ideal for shorter forms or when you want to give the learner the full context at once. It works well for simpler assessments where the questions are not overwhelming and where learners are expected to move quickly through the form.
Each set in the Form is displayed as a tab in the Form: This is better suited for longer or more complex forms where content can be logically grouped into sets. It's a good option when you want to guide the learner through a more structured flow, especially if different sets of questions require different kinds of thinking or concentration (e.g., different topics or formats like multiple-choice vs. essays).
Creating Tabs in an Assessment Form
Create Sets and Questions in the Assessment Bank Begin by setting up your sets and questions in the Assessment Bank. Each set will contain a group of related questions.
Create the Specification Next, create a Specification. This is where you define the structure of your assessment form by adding the sets you want to include.
Add Sets to the Specification In the Specification, you’ll select the Sets that you want included in the assessment form. These sets will become sections within the form.
When you enable Sections as Tabs, each section of your form (based on the sets you've added) will appear as a tab at the top of the form. This makes the form more organized and navigable, especially if it contains multiple sections.
Allow Tab Navigation (Optional) As an administrator, you have the option to control how users navigate between tabs. If Tab Navigation is enabled, both Next and Previous buttons will appear, allowing users to freely move between sections/tabs. If Tab Navigation is disabled, only the Next button will be visible and only forward progression through the assessment is allowed.
When Tab Navigation is disalbed, then an addition setting can be selected to display a Single Question per Tab. If Single Question per Tab enabled then only one question is displayed on the current tab at a time.
Add the Title for each Tab The Administratror needs to set the Title for each Tab that is appearing on the Assessment Form. If a Title is not added, it will display as "Untitled" - After configuring the tabs, go to the Forms tab, then click on the Section tab. - Next to the Title heading, under the Content Heading, click on the pencil icon (). - Enter the desired title that you want the learner to see on the assessment form for that specific tab. - Click on the Save button to save your changes. - Repeat these steps for each tab in the assessment form to set individual titles.
There are 2 ways to Publish a course to the portal:
From the Course itself;
From the Sites toolkit.
1. Publish a Course to the Portal, from the Course:
In the Course, click on the Course Setup tab, then the Publication tab.
Select the Site URL in the Web Portal field (organization.insite.com / organization.shiftiq.com).
Select the Web Folder (page) where you want to publish the course to.
Click on the plus icon () next to the Web Page field. This will generate the URl (Course Slug (URL Segment)) for the Course.
The Web Page Status field will appear with a Published checkbox. This box will be selected by default and the Course will be Published. If you wish to Unpublish the Course, unselect teh checkbox.
Click the Save button.
2. Publish a Course from the Sites toolkit: Courses remain visible to administrators only, unless they are published to the Portal. The Portal is where your users will access your Courses.
In a new browser tab, open the Sites toolkit. Navigate to the page where you would like to add the course to.
Under the Page Setup tab, click on the Settings tab. Click on the Pencil icon next to the Layout (Content Control) field.
Below the Update Content heading, select Course from the dropdown menu below Layout (Content Control), then select the Course you want to publish on the portal from the dropdown menu.
Method 1 - User resets their own Users can also reset their own passwords by clicking the Reset my password button on the initial login window. The system will ask them to enter the email address associated with their account and click Continue. It will then send them a link to a Reset Password screen where they can set their own new password.
Method 2 - Admin resets Password on behalf of user From the Admin Home page, search for the user you would like to reset the password for (Searching Contacts).
Select the System Access tab and under the Sign In tab click on the Reset Password button (on the top right of the card). The Reset Password dialogue box will appear with a system generated password; you can accept this OR overwrite both fields with one you've created. Click on Save in the Reset Password dialogue box.
Next click on the Send Email button and select Welcome. On the Send Email screen, select the Shift iQ Alerts (Mailgun) sender and review the information in the content field. You are able to make changes to the content if needed, then click the Next button. You will be redirected to the Confirm screen to review the message that will be sent to the user. Click Confirm to send the message.
The Welcome Email will include the user's Login Name (Email), new Temporary Password and Login link. The user will be prompted to change the password on the first login.
Exit out of the contact record without saving; by doing so the system will reset the password expiry date for the record to the current date and time, which is what forces the user to change their Temporary Password upon logging in.
Note: There may be some situations where you don't wish to have the password expire when resetting it (i.e., test users); in this case you can set a desired expiry date and then save the contact record. Be aware that for unexpired passwords, the user will not be prompted to change it when logging in.
Passwords must have a minimum of 8 characters, use at least one uppercase letter, one lower case letter, one number and one symbol.
If a user is no longer needed, or requests to remove their personal information, you are able to archive the user from the system.
If you’d prefer to keep the user records, just change the First name, Last Name and Email/Login Name to something generic like: First Name: Removed Last Name: User Email/Login Name: [email protected]
On the Person tab: disable their email addresses and remove any personal information they may have added, including home addresses and uploaded documents. Optional: Add a comment to their record indicating at whose direction they are being archived. Click Save.
On the Memberships tab, remove them from all group memberships they have. Click Save.
On the System Access tab, Sign In sub-tab, uncheck the System Access box, any Roles they are still in, and their acceptance of the Terms and Conditions. Set their Archive Status to Archived. Click Save.
You are also able to delete contact records, but this is only recommended for test users that are no longer needed. Prior to deleting these users, we recommend deleting any of the user's records such as Survey responses, Assessment attempts, Invoices, Registrations, Gradebooks, Achievements, etc.; any test data that is also no longer needed. If the contact is deleted without do this, some records will remain but will appear as having been completed by an unknown user.
NOTE: Only admins with access to bulk update contacts can do this. Contact to get access or provide Support with the list to update for you.
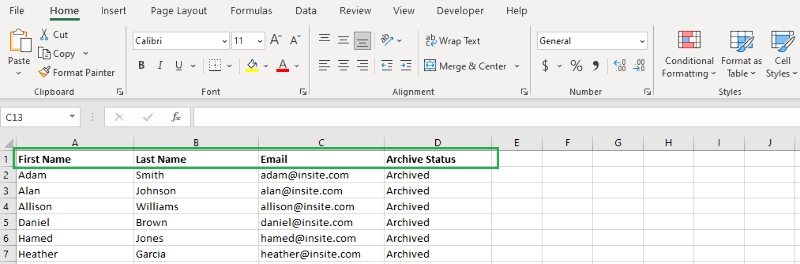
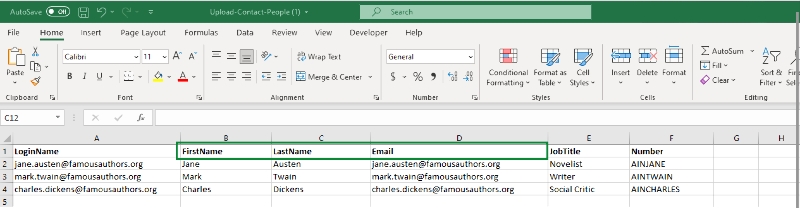
Create a CSV UTF-8 (comma delimited) (*.csv) file containing all the contacts you want to archive. The file should contain the following columns:
First Name
Last Name
Archive Status (For each row, indicate the contact is Archived)
Go into Contacts toolkit and under the Contact People heading, select Upload Contact People
Select the CSV UTF-8 (comma delimited) (*.csv) file with the contact details of the users you would like to archive. Your upload file must be a spreadsheet saved as a CSV UTF-8 (comma delimited) (*.csv)
Click Next
Choose the fields into which you want to upload your contact data. There are required fields that need to be completed for the update to be successful:
Unique Identifier Type (Usually Email)
Unique Identifier (Usually Email)
First Name
Select Upload and Save Changes
Administrators can add Reference Materials for Online Sessions (Acronyms, Formulas and/or a Document).
These materials will appear to the Assessment taker at the top of the Assessmemt Attemp page. By clicking on the different icons at the top of the page, it will open the uploaded files.
Documents: Acronyms: Formulas:
Search for the Assessment Bank where you want to add the reference materials.
After opening the Assessment Bank, click on the Attachments tab and then the Add Attachment button.
Click on the magnifying glass icon () and select the file you want to upload.
For images, the file needs to be in a .png format.
For documents, the file needs to be in a .pdf format.
On the Add Attachment page, update the Title and File Name.
If uploading Acronyms, update the Title and File Name to Acronyms.
If uploading Formulas, update the Title and File Name to Formulas.
You are also able to update image Dimensions:
Image Resolution (DPI)
Actual Dimensions (pixels)
Target Online Dimensions (pixels)
Click the Save button
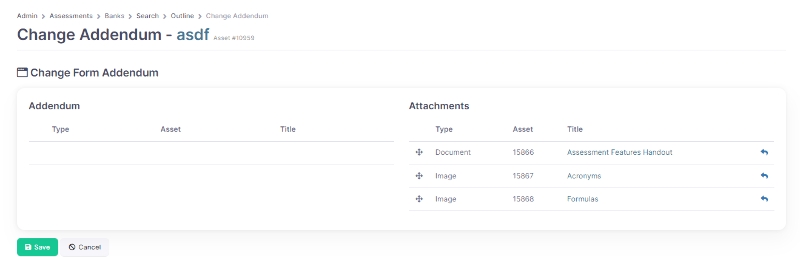
After uploading the file to the Assessment Bank, select the Form the file need to be attached to.
Under the Forms tab, click on the Addendum tab.
Click on the Pencil icon () next to the Attachments heading.
Move the uploaded Document/Image from the
Click the Save button.
The files will now appear under the Addendum tab of the From.
This screen contains all of the information related to each contact in Shift iQ. Find and update personal details, employment info, addresses, any related uploaded documents, internal comments, a history of changes to the contact record, and more on the Persons tab. Use the Memberships tab to see and edit the groups they belong to and other relationships. The Records tab contains links to a variety of assets the contact may have generated. Grant and control access on the System Access tab.
Deleting a Contact Record: Deleting contact records should be used with caution. Deleting a contact will remove the link to all of their activitity in the system and is typically only done with duplicate records that have never logged in. If it is someone who has had activity but left your organization, it is better to Archive the user and remove their access to the system using the Sign In tab.
Edit: Make changes to any of the fields in the Person panel and click Save.
New: You can ‘create another contact’ using the ‘New’ button
View Change History: To view the change history of a specific user or contact
Report: To get record of contacts detailed data
(Note that some of the options below are only available to admins with Write and Delete access.)
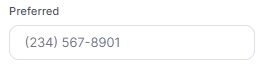
When an telephone number is added to a users Contact Record, Shift iQ automatically configurates the phone number based on the number of digits added:
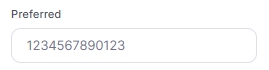
If you save the record with 10 digits in any of the phone fields, our system adds brackets around the first 3 digits, adds a space after the second bracket and adds a dash before the last four digits. Example: 1234567890
If you put 11 digits and save, it removes whatever the first digit is, adds brackets around the first 3 digits, adds a space after the second bracket and adds a dash before the last four digits. Example: 12345678901
If you put periods or dashes in between 10 or 11 digits, our system removes those dots or dashes, adds brackets around the first 3 digits, adds a space after the second bracket and adds a dash before the last four digits.
You are able to add web links or email addresses in the text of your content.
When you select Create Link, the system will create the outline needed for the link [](http://). Between the square brackets, add the text you want to be displayed. Copy and Paste or type the webpage you want the user to be directed to. Example of what the link will look like: [Shift iQ](http://www.shiftiq.com). In your page content, the link will display as Shift iQ. The user can click on the text and will be directed to the webpage you added.
You are able to configure the link with an email address instead. You can either add a email address between the square brackets or text. Instead of adding a website, you remove the http:// and add mailto:add email address. The full link will be [Click Here to Email](mailto:[email protected]) or [[email protected]](mailto:[email protected]). The text will display as Click Here to Email or [email protected]
If you require the link you are inserting to open on in a new browser window, you can us the following link: <a href="url or link to file" target="_blank">text to display</a>
An example of the full link will be: <a href="http://www.shiftiq.com" target="_blank">Shift iQ</a> The text will display as and when you click on the text it will open the web page in a new browser window.
You are able to drag and drop a picture from file into the body of the content. Accounts are configured with a file size limit of 1MB per image. If the file size is bigger than 1MB, please decrease the size of your file before uploading it, or contact your administrator to upgrade the settings for your account. The recommended maximum size for an upload image is 800x800 pixels. If a size of your image is bigger 800x800 pixels, the system will automatically scale the image for you. You might want to resize your own images before you upload them. When you added the picture to the content, it will display in a URL format: e.g. 
In the Course you will be able to see the picture you uploaded.
File types supported: .png, .gif, .jpg, .jpeg
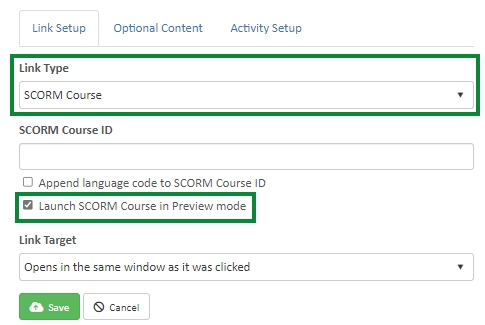
When adding a SCORM course to Sandbox or Development, if you select SCORM Course for the Link Type then it is set to Preview mode by default and the Launch SCORM Course in Preview mode is selected by default.
When you are working in Production, if you select SCORM Course for the Link Type, then the SCORM launches in “Normal” mode by default and the Launch SCORM Course in Preview mode is not selected.
Every Bank will contain at least ONE Specification. Specifications provide the rules that determinewhich questions will be contained on an exam Form. The same Specification may be used for multiple Forms, or there may be a different specification for each Form.
Important Note when using Filter Type in Specifications: The Set Weight stores the value entered by an administrator in GAC % column on Workshop page and helps calculate the values for the Pivot Table Filter, and then the Pivot Table Filter will determine the set number of questions on the form. In other words, the Set Weight only makes sense when the Filter Type in the Specification is set to Filter with Pivot Table.
The Set Weight is not used in question filtering, even when Filter Type is Filter with Pivot Table. The Pivot Table Filter only applies to the questions filter while the Set Weight is only used to store the value that was used to calculate the Pivot Table Filter values.
The value in the Question Limit only affects the set of form questions when the Filter Type is set to Include All Questions. Set Weight is not applicable and has no effect on the creation, delivery, or marking of the form if the Filter Type is set to Include All Questions.
Before attaching an Assessment Froms to a learners registration, you need to attach the required Assessment Forms to the Class. You are able to attached multiple Assessment Forms to a class.
Under the Class Setup tab, scroll down to the Assessments card and click the Add Form button.
Filter for the Assessment Form you want to attach to the Class and select the Form. The selected Assessment Form will be displayed below the Add Form button. If you attached the incorrect Form, you can click the Trash Can icon () on the right side of the Form to remove it from the Class.
If more than one Assessment Forms need to be attched to the Class, follow the same process as above for each Form you want to attach.
In the Class, click on the Registrations tab.
Under the Assessment column, next to the Learner's registration, click on the drop down field and select the Assessment Form you want to assign to the Learner. This is the Assessment Form the learner will be served up with when they login for their exam.
If you attached the incorrect form, you can click the Cancel icon () below the form, and then select the correct Assessment Form.
The Learner will not se any details of the Form that is attached to their registration in the UI, they will only see the Form once they login for their exam.
Note: Only one Assessment Form can be attached to learner's registration.
After Questions are created in a Set, administrators are able to reorder those questions if needed.
Under the Question tab, click on the Reorder button on the top left of the page.
When you move your curser over the questions you will see a hand () icon. Click and drag the selected question into the required position.
Once all the reorder is completed, click the Save button.
Question Sets in an Assessment Form can be can be reordered so the sets appear in a specific order for each form.
Create your Assessment From and select the Sets and Question you want included in the Form.
Click on the Forms tab and click on teh Reorder button.
Select the Section tab.
On the right, click on the arrows under the Section Number heading ().
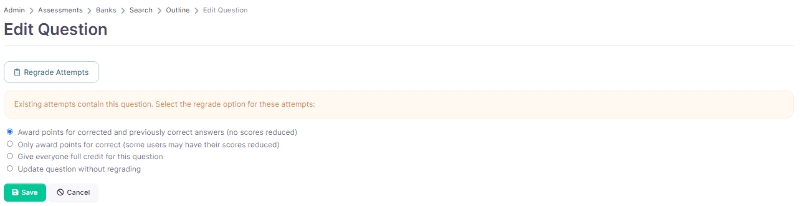
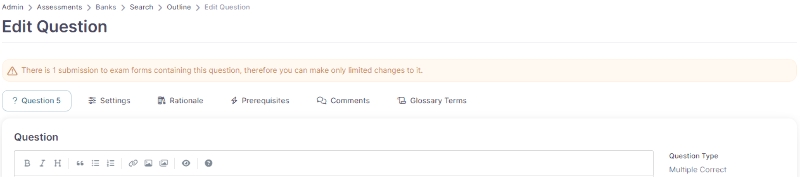
Depending on the Organization setting, Administrators are able to edit existing Assessment questions. When editing questions that have already been published to a Form, a warning message will appear at the top of the page.
This warning message is to advise admins that there are existing exam forms using the question and how many submissions have been received for the question they are about to edit. If a change is made to the question, and it can potentially affect previous submissions, you will be directed to the Regrade Attempts screen after making your changes.
Depending on the change that was made to the question, an Admin can choose if they want to regrade the question or update the question without regrading.
Example: If the incorrect option was setup as the correct answer, and a admin corrects the mistake, they can choose if the fix should be applied to previous attempts or not by selecting one of the Regrade Options provided
Any questions being edited will be available for learners who have not started a exam. If changes are made to a question, while a exam is in progress, the change will not be available to the learners.
Additional information about question configuration settings can be found here
Open the Assessment Form and click the Action button.
Select Unpublish.
Click the trash can icon next to the question you want to remove. You’ll be redirected to the Delete Confirmation page.
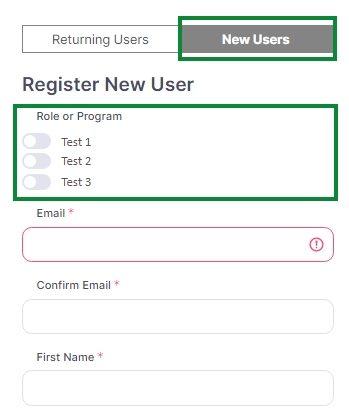
If your organization would like to allow users to create their own accounts and access some content without a manual approval step, we can configure your account to do so. The user journey would be as follows:
The User creates their own account using the New Users tab of the login screen, adding their own email, first name, last name and password. The User is immediately granted access to your portal and any content (tiles) that have no privacy settings. The User also receives an automated system alert, indicating their account has been registered and approved.
If your organization is configured with a choice of groups a user can join (subscribe to), and the user toggles one of those groups when creating their account, they also immediately become members of that group, and can see whatever portal tiles that group has access to. The group can be configured to send notifications to the user (welcoming them to your account, explaining what they can access and possible next steps) and/or to your administrators (notifying them of the new user). These optional notification emails are hooked up in the
After an Form was created for an exam, an Administrator can test the Form by Publishing or Pre-Publishing the Form.
Publish the Form as a Standalone Form, with permissions so only the Administrator can see the From on the Portal. (See )
From the portal start the exam and review the following to ensure they are as desired.
On the Start Page:
Administrators can setup Course Stalled Notifications and Course Completed Notifications.
Course Stalled Notifications
Course stalled notifications can be sent to Learners and Administrators.
To Learner Send a notification to the learner to remind them that they started the course and seem to have stalled.
To Administrator Send a notification to the Administrator to advise that a learner started the course and seems to have stalled.
Navigate to the Exam Form in the Form Tab.
Select the Form tab.
Click on Action button and select Publish.
From the Course home page (/ui/admin/courses/home):
Create Catalogs Names
Create Categories
Open the Course you want to add to the Catalog
This feature is generally used to upload multiple NEW contacts records into your Contact toolkit. Use with Caution if you want to update exisiting Contact records. If any of the information in your upload spreadsheet does not match the information on a record in the system for that unique login name/email address, it will overwrite the existing information. For example, if the name in the system for user "[email protected]" is Robert Doe and the spreadsheet says Bob Doe, Bob will overwrite Robert.
To bulk upload contacts:
Create a CSV UTF-8 (comma delimited) (.csv) file with at least the first name, last name and email address of the contacts you want to add. You can upload additional information as well, if desired, such as addresses, phone numbers, account numbers, etc., and you can save an existing Excel or other spreadsheet as a CSV UTF-8 file as well. Make sure your columns have header names that can be mapped to the upload screen.
Imbed videos Upload your video to a Vimeo (or other cloud-based hosting account. Copy the imbed link directly from there and paste it into the content panel of the survey. The video will integrate seamlessly. Insert links to internal files 1. Upload the file to the Files toolkit 2. Copy the download URL off the file and paste it into the content Insert hyperlinks
You are able to add web links or email addresses in the text of your content.
When you select Create Link, the system will create the outline needed for the link [](http://). Between the square brackets, add the text you want to be displayed. Copy and Paste or type the webpage you want the user to be directed to. Example of what the link will look like: [Shift iQ](http://www.shiftiq.com). In your page content, the link will display as . The user can click on the text and will be directed to the webpage you added.
You are able to configure the link with an email address instead. You can either add a email address between the square brackets or text. Instead of adding a website, you remove the http:// and add The full link will be [Click Here to Email](mailto:[email protected]) or [[email protected]](mailto:[email protected]). The text will display as or
We've implemented the ability to move Assessment Banks from one Organization to another, and ratain the original Competency mapping.
Download the question bank
In the exporting organization, download the question bank by clicking on the Download JSON button in the Assessment Bank.
Download the framework and the file with hooks in it
Go to the Standards search screen in the organization from which you are exporting the framework.
After a Class is created, the following information can be added or edited under the Class Setup tab:
Identification
Achievement: Achievement that contains the Program you want to evaluate with this class.
Event Title: The descriptive title for this class.
An image can be added for the Course tile, when the Course is Published to the Portal.
Click on the Course Setup tab and then the Publication tab.
Next to the Upload New Course Image field, click on the magnifying glass icon ().
Select the image you want to use for the Course tile.
Select the Events toolkit on the Admin Home Page.
Select Schedule a New Exam Event in the Administration Tools panel.
Select the Exam Type you want to create
Class
To embed a video on a Course, you will need to upload the video to either Vimeo or You Tube.
After video is uploaded, select Share, this will give you an Embed link.
Copy and past the link into the body of the course content to add the video and click Save
If you do not have a Vimeo or You Tube account to upload the video, we can provide this service. Once uploaded, we will share the Embed link with you; please email .
Under the Registration tab, Administrators are able to manually Add Registrations to a class and download different class Reports.
Adding Registrants
Under the Registration tab, click on the Add Registration(s) button.
Content can be added to a class to provide users with a description or additional information about the class they are registering for.
Under the Content tab, you are able to add or edit the following Class details:
Title: Name of the Class.
Summary: Short description of the class.
Description
If the group the user joins is configured with a mandatory survey (application form), they will be prompted to complete and submit a response upon creating their account. The survey can also be configured to send a notification to the user when they have submitted a response (thank you for applying, your response will be reviewed, etc.) and/or to your administrators (notifying them they have an application to review). These optional notification emails are hooked up in the survey itself.
Once the survey response (application) has been reviewed by an admin; the admin can remove the user from the “applicant” group and add them to another group that has access to additional or different portal tiles. Once again, the groups can be configured to send notifications to the user (you have been approved for x group, log in now to see additional content) and/or to other internal staff (a new learner has joined x group). These optional notification emails are hooked up to each group a user might be placed in.
All notifications must be created and configured in the Messages Toolkit, prior to being hooked up where needed. Do not add any subscribers to any notifications going to users. Do add subscribers to any notifications going to admins, as desired for each one. We suggest you use the internal name of the message to distinguish between them: Notification to User on completion of application, Notification to User welcoming them to x group, Notification to admin that an application has been completed, etc.
Send Notification After Days Set the number of days that a learner has not accessed the course before the stalled notifications are sent.
Max Notification Count Set the maximum amount of notifications to be sent to learners when they have stalled.
Message Variables for Course Stalled Notifications:
$AppUrl
$CourseName
$CourseStarted
$LearnerIdentifie
$LearnerFirstName
$LearnerLastName
Course Completed Notifications
Course completion notifications can be sent to Learners and Administrators
To Learner Send a notification to the learner to confirm that they completed the course.
To Administrator Send a notification to the administrator to advise that the learner completed the course.
Message Variables for Course Completed Notifications:
$AppUrl
$CourseName
$CourseStarted
$LearnerIdentifie
$LearnerFirstName
$LearnerLastName
In the Catalog Settings card select the Catalog you want to add the Course to, then select the Category for the course.
For Categories to appear, your course must be connected to a gradebook. If no Gradebook is attached, click on the Records tab and attach the Gradebook.
Change your search results to search for all Standard Types, by selecting the blank option from the dropdown list.
Under the Settings heading, change the column visibility so that you can only see the Hook and Title columns.
Click the Search button. You will get more than you need, but it does not matter because the hooks will be unique.
Click on the Download tab and download all the search results.
In the *.csv / *.xlsx download, change the order of the columns so that Standard Identifier is in Column A and Standard Hook is in Column B.
Delete the 1st row in the spreadsheet and save your changes.
Now you can proceed to download the Competency Framework you want.
Upload the framework DON’T UPLOAD YOUR FRAMEWORK TO THE ORIGINAL ORGANIZATION ACCOUNT.
In the new organization, open the Standards toolkit and then click on Add New Standard at the top of the page.
Select Upload one new standard from a file from the dropdown list.
Select the *.json file for the Competency Framework you downloaded and upload it normally. The hooks will automatically be uploaded.
Upload the bank
In the new organization, open the Assessment toolkit and then the Banks tile.
Click on the Add New Bank link at the top of the page and select Upload one new bank from a file link from the dropdown list.
Select the *.json file for the Assessment Bank you downloaded.
In the Standard Hooks box, paste the first 2 columns (Standard Identifier, Standard Hook) of the spreadsheet that maps the hooks with the standards identifiers
Click the Save.
Event Identifier: A globally unique identifier for this class.
Source: The background source or external reference code for this class.
Schedule Information
Event Start: The start date and time for this class event.
Event End: The end date and time for this class Event.
Duration: Duration of this class event.
Credit Hours: The number of credit hours associated with completion of the class.
Publication
Status: The business process for managing classes has several steps; this is the current step in the process.
Registration Start: The date and time when registration for this event is open, after which new registrations are permitted.
Registration Deadline: The date and time when registration for this event is closed, after which no new registrations are permitted.
Location Information
Venue: The Venue where the class is taking place.
Attendance
Capacity: Set the capacity limit for the class. Enter the Minimal Capacity (Optional) and Maximum Capacity number of registrants required to attend a class. If there is no minimum number of registrants required, you can leave the Minimal Capacity section blank and only add the maximum number of registrants that can attend the class.
Waitlisting: Enable or Disable the ability to allow Waitlisting for a class.
Instructors
Instructors: Add instructors for the Class by clicking on the Assign Instructors button.
Search for the Instructors by Name, Email or Group.
Select the Instructor and click Add
Individual (Not Accommodated)
Sitting
Select Exam Format
Online
Paper
Class/Session Code (The reference number for related training programs)
Billing Code (If you require billing codes to be added, please contact your InSite Account Representative to assist.
Add the Start Date and Time for the Event
Add the Exam Candidate Limit (Capacity)
Select the Venue for the Exam Event (The training provider, organization, or agency hosting the event)
If the Exam Event will be in a specific Building and Room, add the physical location within the venue where the event occurs.
Click Save
Select the user you want to add to the Class and click Add button.
Edit Registration
Click on the Pencil icon next to the users registration.
On the Edit Registration page, you are able to update the following information:
Hours Worked to Date (if required)
Approval status (The current status of the Participant at the time of this registration.)
Attendance status (The current status of this record in the registration process or workflow.)
Comments (Additional information that is specific to this registration.)
Seat
Registration Fee amount
Billing Customer
Employer
Click Save after changes were made to the users registration.
Download Reports
Reports available for Classes:
Registration Report (*.pdf / *.xlsx)
Detailed Registration Report (*.pdf / *.xlsx)
Attendee List (*.pdf / *.xlsx)
Scores Report (*.pdf / *.xlsx)
Most Improved Report (*.xlsx)
Materials: Any additional documentation or instruments a learner will require for the class.
Instructions
Contact and Support
Accommodation
Additional Information
Cancellation and Refund
Registration Completion
tag
Tag
taxonomy
Taxonomy
difficulty
Difficulty
lig
LikeItemGroup
reference
Reference
When you move your curser over the Question Sets you will see a hand () icon. Click and drag the selected Question Set into the required position.
Click the Save button.
Classification
Code - This is a unique code assigned for internal filing and/or reference.
Tag - Assign any number of tags to this question for searching and filtering.
Taxonomy - Refer to the Trades Taxonomy for details.
Know, Do or Solve
Difficulty - The estimated difficulty for this question.
Very Easy, Easy, Moderate, Hard or Very Hard
Like Item Group - Use the Like Item Group (LIG) to assign this question to a collection of similar questions, where mutual exclusivity in an exam is needed.
Reference - The source material for this question (e.g. industry regulation or code book reference).
Administration
Condition - The current condition of this item in your question bank.
Copy, Edit, New, Purge, Surplus or Unassigned
Current Flag - Assign a flags to this question for special attention.
Calculating and Scoring
Maximum Possible Points - The maximum number of possible points awarded for an answer to this question.
Cut Score (%) - The average of the cut scores for correct answers. Incorrect answers have a cut score of zero.
Randomization and Display
List or Shuffle - List options in the sequence they are input or in random order.
Option Layout - List options in a single column or in a multi-column table.
Question Set
Question Set - The Set to which the question is assigned.
Competency - The competency evaluated by this question.
Tags - If Competency Tags are available, you can assign these tags to the Assessment Questions.
Administrators can add Rationale to Question Options. Rational can be added for:
All Answers - Provide feedback to a candidate regardless of the answer submitted.
Correct Answers - Provide feedback to a candidate who answers the question correctly.
Incorrect Answers - Provide feedback to a candidate who answers the question incorrectly.
Description - Provide a description of the purpose or key feature of this question.
#### Question Prerequisites/Triggers
Course Activity Prerequisites When an Assessment is linked to a Course, Prerequisites can be set to release specific lessons within the course, based on the answers they provide in the Assessment.
To add a Prerequisites, click on the New Prerequisite button. Under the Learner Answer heading:
Select Correct or Incorrect
Under the Unlocks Course Activity heading:
Select the lesson you want to unlock based on the Correct/Incorrct answer the learner provided.
Click Save
Click the Save button.
If you require the link you are inserting to open on in a new browser window, you can us the following link: <a href="url or link to file" target="_blank">text to display</a>
An example of the full link will be: <a href="http://www.shiftiq.com" target="_blank">Shift iQ</a> The text will display as Shift iQ and when you click on the text it will open the web page in a new browser window.
Markdown We recommend that content be entered in Markdown. This allows for consistent delivery across all varieties of hardware and software platforms. It also facilitates translation of the survey. You may use HTML tags when necessary, but try to limit their use.
(Also See: Markdown References)
Any organization's admins can upload NEW contacts with the bulk upload tool. However, this tool can also be used by those with permission to bulk update existing contacts. Typically, bulk updating should be done by Platform Administrators, or well-trained super admins, to prevent overwriting information that should be kept. Here's how our Support team can give the latter access:
Create a separate role group such as "Access to Contacts Upload" and just add the admins who should have access and know how to use it properly.
While logged in to the tenant account, click on Settings, then Actions. Set filter for action url of admin/contacts/people/upload/update and open that action.
In the Authorization panel, add the group that should have permissions to bulk upload, and save.
Admins will need to log out and back in before permissions will be applied to their accounts.
Edition (Required Field): The edition of this bank (e.g. Year and Month).
Select Save.
Select the Level Type (Optional): Certificate of Qualification, Endorsement Exam, Foundation Exam, Interprovincial Standard Exam, Standard Level Exam.
Edition (Required Field): The edition of this bank (e.g. Year and Month).
Select Save.
Bank Title: The descriptive title for the bank
Summary: The purpose or executive summary for the bank
Print Form (compact) - A PDF download containing all the answers to the Questions in the Bank.
Enable Sections as Tabs After creating the Specification, go to the Specifications tab and then select the Specification you just created. In the Configuration section, look for the Sections as Tabs option. Toggle the slider to enable this feature.
Click Save
The course will be published on the portal for users to complete.
Archived Status
Target Paper Dimensions (pixels)
Palette (Color/Black and White)
BUT if you put more than 11 digits in any of the number fields, our system converts it to a straight number, no characters. Example: 1234567890123
On the right side of the page, in the Impact card, select the form you want to remove the question from.
This will remove the question from the form only, the original question will remain in the Question Bank.
If you select the checkbox next to the Bank Asset, it will delete the questions from both the Bank and the Form, including all aggregate attempt data.
After making your selection, click Delete.
Click the Add button and choose Question (or Existing Question).
Select the checkbox next to the question you want to add to the form.
If you need the questions in a specific order, click the arrow icon and drag and drop the question into the desired position.
Click Save.
Click the Action button again and select Publish.
Choose the publication options (such as Learner/Assessor Feedback, Instructor Rationale, and Access) and click Save.
The form with the updated question(s) is now published and available for users to submit attempts..
Instructions;
Time limit for the exam
When attempt is started
The Learner Feedback icon () and functionality, if selected. If so, ensure question feedback is working by posting a comment, and using Review Feedback to check.
Check Bookmark functionality ().
Exam countdown Timer (If enabled).
Complete and submit your attempt to review:
Scores are disclosed as desired.
Additional attempts for the exam are available as desired.
If Assessment Attempt is locked after the allocated time has run out.
An Administrator can Pre-Publish an Assessment Form for testing purposes. You will be able to complete the Assessment Form and submit your attempt.
In the Question Bank, select the Forms tab.
If you have multiple Assessment Forms for the same Assessment Bank, select the From you want to Pre-Publish from the dropdown list at the top of the Form page.
Click on Action button and select Prepublish.
On the Pre-Publish page, you will see a URL on the right side, under the Start an exam attempt heading. Click on this URL to start your attempt.
This Pre-Publish URL is intended for use by administrators only, to review and test the Assessment Form. It should NOT be shared with actual Assessment takers. To publish an Assessment FROM for non-admin testing, please see .
Important Notes:
The Pre-Publish URL is for Administrator Access Only. This link is strictly for administrative testing and review of the assessment form. Distribution to, or use by, actual assessment takers is NOT advised. Any assessment attempts completed using this link are considered to be tests and are NOT recorded by the system.
The system does not keep attempts for Forms that has an Publication Status = Drafted. If an attempt is submitted, while the form has an Publication Status = Drafted, the last thing the learner's session does is clean up after itself by deleting the attempt. There will be no record of the Pre-Published attempt. If you want to have a record of a Published attempt, then you should publish the Assessment Form as a Standalone Assessment on the Portal. (See How to publish an exam Form
Candidate Feedback - Allow exam candidates to submit feedback on the questions in this exam. (Required Field)
Instructor Rationale - Show (to candidates) the rationale behind the questions in this exam for correct and/or incorrect answers.
Set Access for the Exam:
As part of a Training Program - The exam is delivered in the context of a specific e-learning module.
As a Standalone Assessment - The exam is delivered directly to candidates.
If Standalone is selected, select which group(s) should have access to this exam (Note: If the group does not currently exist, a new Permission List should be created ().
Enter Tile Tag (The text to be used for the program tile on the portal home page) and Icon Choice (The FontAwesome icon to be used for the program tile on the portal home page).
After all setting for the Assessment Form has been selected, click the Publish button.
Go into Contacts toolkit and below the People counter, select Upload Contact People.
Select the CSV UTF-8 (comma delimited) (.csv) file with the contact details of the users you would like to add. Your upload file must be a spreadsheet saved as a CSV UTF-8 (comma delimited) (.csv) file.
Optional: the contacts you are uploading can all be attached to a specific group if desired. Select an existing group or input the name of a new group.
If you want all the uploaded users to have system access, check the box Approve login credentials for all uploaded contacts. They will then be able to sign in to the system with the same permissions as the group listed in step 4. If no group is chosen, they will only have portal access and any portal tiles that have no privacy settings turned on. Note that uploaded contacts do not automatically receive a welcome email informing them of their temporary initial password.
Click Next
Choose the fields into which you want to upload your contact data.
Required Fields:
Unique Identifier Type (usually LoginName)
Unique Identifier (usually Email, must be unique in the upload file)
Login Name (usually Email, must be unique in the upload file)
First Name
LastName
Map additional column names (addresses, phone numbers, account numbers, etc.) in your CSV UTF-8 (comma delimited) (.csv) spreadsheet to the desired fields in the Upload Contacts form.
Select Upload and Save Changes. If there are any duplicate email addresses in your upload spreadsheet, or if an email address is already in use in our system for a user in another tenant account, you will get error messages. Update or remove those records from your CSV UTF-8 (comma delimited) (.csv) spreadsheet, save and close it, and repeat steps 3-7. If there are no errors, the upload will proceed, and when finished will display the first 3 and last 3 records uploaded/updated from the spreadsheet.
Set Seat Price
Free
Single Price
Multiple Price Levels (Example: members pay less than non-members, see below)
Choose whether Taxes apply for this seat.
Add Seat Agreement (Terms & Conditions that a users needs to Agree to before moving forward with class booking)
Select Save
When creating seats for a Class, different price levels can be created for different users in your Organization (Example: Members pay less than non-members). Only users that are in the Employer group, with the Group Status specified in the seat setup, will be able to see the seat price being created.
Under Seat Price, select the Multiple Price Levels option, and add the following information:
Price Name: The name of the seat, this will be visible to the user when registering for a class.
Price Amount: The cost of the seat.
Group Status: Select the Group Status you are creating the seat for.
The Group Status field is linked to the Group Status added to an Employer group. If none of your Employer groups have a Group Status set, there will be no options availabel to select in this field during seat creation.
Please see for instruction on how to create a new Employer group.
Click the Add Price button to save your changes.
Repeat the above steps to create all different levels of seats required for the Class.
Click the Save button once all the required seats have been created.
Shift iQ allows for a wide variety of assessment question types, including multiple choice, true/false, multiple correct, composed response (voice recording or typed essay), drag-and-drop reordering, matching, hotspot and Likert.
Multiple Choice: Allows the learner to select one correct answer from multiple options, such as Multiple Choice and True/False questions.
Multiple Correct: Allows the learner to select multiple answers from multiple options. There are various calculation methods for Multiple Correct question types:
All or Nothing This should be used when the total score being awarded for that question will not be split between options. If the candidate does not select all the correct options, the candidate will not get any points. When selecting the All or Nothing calculation method, the total points awarded for the question (1 point) is divided equally to all answer options (correct and incorrect). When a learner answers the question, and they select the correct answer options (B and D in the screenshot), they will receive 0.25 for each correct answer and they will also receive 0.25 for not selecting the 2 incorrect answers (A and C in the screenshot). The total points awarded for their answer will be 1 point. If the learner selects a correct and incorrect answer (example A and B) or select the correct answers and incorrect answer (example A, B and D), no points will be awarded to the learner for the question.
Equally Weighted This should be used when all the options are correct, the points awarded to the question will be divided equally among all the options. When selecting the Equally Weighted calculation method, the total points awarded for the question (1 point) is divided equally to all answer options (correct and incorrect). When a learner answers the question, and they select the correct answer options (A, B and C in the screenshot), they will receive 0.25 for each correct answer and they will also receive 0.25 for not selecting the the incorrect answer (D in the screenshot). The total points that will be awarded for their answer will be 1 point. If the learner selects correct and incorrect answers (example A, B and D) or select all the correct answers and the incorrect answer (example A, B, C and D), points will only be awarded to the correct answers selected. No points will be given for the incorrect answer selected. E.g. Learner selects A, B and D, points will be awarded for A and B, scoring the learner 0.50 for their answer, no score awarded for D.
Correct Minus Incorrect This option should be used where points will be deducted where the candidate selects a wrong option. When selecting the Correct Minus Incorrect calculation method, the total points awarded for the question (1 point) is divided equally to all answer options (correct and incorrect). When a learner answers the question, and they select the correct answer options (A, B and C in the screenshot), they will receive 0.25 for each correct answer and they will also receive 0.25 for not selecting the the incorrect answer (D in the screenshot). The total points that will be awarded for their answer will be 1 point. If the learner selects correct and incorrect answers (example A, B and D) or select all the correct answers and the incorrect answer (example A, B, C and D), points will be awarded to the correct answers selected MINUS the incorrect answer selected.
Limited Correct With this option, the candidate is limited to the number of options that can be selected. If there are 2 correct answers, the candidate will only be able to select 2 answers. When selecting the Limited Correct calculation method, the total points awarded for the question (1 point) is divided equally between the correct answer options. When a learner answers the question, and they select the correct answer options (A and B in the screenshot), they will receive 0.50 for each correct answer. The total points that will be awarded for their answer will be 1 point. If the learner selects a correct and incorrect answer (example A and C), points will only be awarded for the correct answer selected and no points for the incorrect answer. Total score awarded to the learner will be 0.50.
Composed Response: Allows the learner to submit a written response.
Composed Voice: Learners can capture their verbal response to a question. This question type is associated with a scoring Rubric and is graded manually by an administrator / instructor. Configuration options include:
Limit Number of Attempts
Multiple True/False: Allows the learner to select True/False in response to a series of statements. Calculation Methods include:
All or Nothing
Equally Weighted
Correct Minus Incorrect
Matching: Allows the learner to select the correct matching response for a given prompt. Calculation Methods include:
All or Nothing
Equally Weighted
Correct Minus Incorrect
Likert Question Type: This is a dynamic question type often included on surveys to assess variables such as sentiment, satisfaction, quality, or likelihood. For standardized exams, this question type can be used for third party assessmsent purposes or where answers options are not binary in nature.
Hotspot Question Type: Any image can be uploaded for use with this question type. Configuration Options Include:
Pin Limits
Shapes Shown vs. Hidden
Image Selection Area - Rectangle or Circle
Ordering Question Type: Top and Bottom Labels can be added to provide additional context to learners. Any number of correct answer options (solutions) can be configured.
Questions in an Assessment Bank must belong to a set in the Bank, and the Bank must contain at least one set before questions can be added. A Bank can contain multiple sets with multiple questions in each set. Sets are typically used to organize questions in a bank by competency Area of a Standard Framework, but can also be used to organize questions in other ways, if desired.
Creating a Set:
Click on the Questions tab, then click on the Add button on the right hand side of the screen.
Select Set to create the first question set.
Add your Set Name (This name uniquely identifies this question set within the bank) and click the Save button.
The question set has now been created and details for the set will be displayed.
Creating Questions in a Set:
Click on the Add button and select Question.
Select a
Input the Question text, including uploading any
Input any text and/or images for each of the Question Answer Options.
The question has now been created will be displayed. can be made to the question by selecting the Edit icon. Continue adding questions and sets as needed to populate the bank.
Login to https://cloud.scorm.com/sc/guest/SignInForm
Select the Organization (Realm) you want to upload a SCORM course for.
Click on Add Content (Top Right Corner) and select Import a SCORM, AICC, xAPI or cmi5 package.
Specify a Course ID for the file you are uploading. Add the language code behind the Course ID you are adding, e.g. Planning-for-Your-Future-V1-en (for English) OR Planning-for-Your-Future-V1-fr (for French) OR Planning-for-Your-Future-V1-es (for Spanish).
Choose the SCORM or xAPI file you wish to upload by clicking on Browse. Once file has been selected, click Import Course.
Once the course has been uploaded, you are able to change the Lauch behaviour in Course Properties. After your changes has been made, click Save.
The Course ID (e.g. Planning-for-Your-Future-V1) is what you use as the
After creating questions for a bank, you may need to update or revise the questions or answer options while still keeping the original question data and any associated attempts intact.
Open the question you want to create a new version of and click the edit pencil next to the question.
On the right side of the page, click on the little arrow below the Current Version heading.
The Publication Status of the question will update to Drafted (In Development).
You can now edit the Question Text and Answer Options as needed. The original Question and Answer Options will remain as is.
After you updated the new version of that question:
If a form has a Specification Type = Static, the question will not update automatically across the forms where it’s used. You’ll need to manually remove the old question and add the updated one. See
If a form has a Specification Type = Dynamic, the question is automatically updated everywhere it’s used, and those updates become immediately available to learners.
The Person Edit screen is one of the most frequently used screens in Shift iQ. It provides access to all information and activity related to a contact in one place. Whenever a contact’s name appears as a hyperlink, clicking it will take you directly to this screen. Information can be both viewed and updated on this screen.
Under the Person tab:
Details: the key details of a contact record, including name, email, gender, birthday, employment details, phone numbers and more; use the Send Email button to send correspondance directly to the contact; use the More Info button to access additional details about the contact; use the History button to view changes that have been made in the past to the contact record.
Other
With your course outline now created, content can be added for each lesson.
Click on the Pencil icon next to the Lesson you want to add content to. On the right side of the page, the Lesson Content tab will be pre-selected. You can update the Title, Summary and Body Text of that lesson.
Once you have made the required updats, click the Save button.
Under the Activity Setup tab you can set your Prerequisite for the lesson. If a prerequisite is set, learners must satisfy these prerequisites before the activity is available to start in the course.
Select a Requirement that learners must satisfy before the activity is considered complete.
Activity Type lists the different lesson types you can have in a course. You can select a different lesson type by selecting the field next to the type name.
The Typing Speed quiz is an assessment designed to measure how fast and accurately someone can type. The test typically involves typing a set of words or a passage of text within a specific time frame (usually measured in seconds or minutes). The goal is to assess the user's words per minute (WPM) rate and their accuracy.
Creating a Typing Speed quiz:
On the Admin Home screen, select the Assessment toolkit.
Click on the Typing Speed tile under the Single-Question Quizzes section.
Add Lesson Name.
Click Save button.
New Assessment
Add Assessment Name
Select if you are Adding New Form or Selecting Existing Form
If you Add New Form, add the Number of Multiple-Choice Question and Passing Score.
If Selecting Existing Form, select the Assessment From from the dropdown list and set Passing Score.
Click Save button.
New Survey
Select the Survey Form you want to attach to the Lesson.
Click Save button.
New Document
Add the Document Name
Click Save button.
New Link
Add Link Name.
Select the Link Type
External Web Page
Internal Web Page
SCORM Course
Add the Link URL and select if you want to URL to** Open in a new window or tab**
Click Save button.
New Video
Add Video Name
Add Video URL
Select Video Target
Opens in a new window or tab
Opens in the same window as it was clicked
Opens in teh full body of the window
Opens in an embedded frame
Click Save button.
New Interaction
Add Interaction Name
Click Save button.
Click on the Plus icon next to New Module and select the what Activity Type you want as the first lesson in the course.
Add the Module Name and the required information for the Activity Type you selected.
Click the Save button.
If you want to add multiple units to your course, ensure that Multiple Units are Enabled. You can enable multiple units by navigating to the Course Setup tab and then under the Course Details tab select Enabled under Multiple Units and click Save.
Click on the Plus icon next to New Unit and select the what Activity Type you want as the first lesson under the Module in the New Unit.
Add the Unit Name, Module Name and the required information for the Activity Type you selected.
Click the Save button.
Lesson: A standard lesson where learners can go through content and materials.
Assessment: A quiz or test to assess the learner's knowledge.
Survey: A survey that collects feedback or information from learners.
Document: A downloadable file or resource, such as a PDF.
Link: A clickable link that directs learners to an external website.
Video: A video lesson or content that you can embed for learners to watch.
Single-Question Quiz: A single-question quiz could be used for either a speed typing test or a data capturing test.
For a speed typing test, the question could be about typing a sentence or a set of characters as quickly and accurately as possible, with the test measuring typing speed or accuracy.
For a data capturing test, the question could involve entering specific information (like text, numbers, or selections) from a given dataset, testing the learner's ability to accurately capture or transcribe data.
In the Activity Name field, you can update or rename the lesson.
You have the option to make lessons adaptive by selecting Adaptive under Activity Settings. When Adaptive is selected, the lesson will be hidden in the course until the lesson is unlocked..
Click Save button after all changes were made.
Click on the Add New Quiz link located at the top of the page.
On the New Quiz page, fill in the required fields:
Quiz Name
Enter a descriptive name for the quiz (e.g., "Typing Speed Test 1 Minute").
Time Limit (seconds)
Set the time limit for how long learners will have to complete the test (e.g., 60 seconds).
Attempt Limit
Set how many times learners can attempt the quiz (e.g., 1 attempt).
Optional Fields for setting a required performance threshold:
Maximum Possible Points:
Set the maximum number of points the quiz can be worth.
Points Required to Pass
Set the number of points needed to pass the quiz.
Passing Score (%)
Set the percentage needed to pass (e.g., 80%).
Passing WPM
Set the minimum Words Per Minute (WPM) needed to pass.
Passing KPH
Set the minimum Keystrokes Per Hour (KPH), if relevant.
Passing Accuracy (%)
Set the required accuracy percentage (e.g., 95%).
In the Quiz Text card, add the text you want the learner to type in the content box. This could be a sentence, paragraph, or set of words.
Click Save.
If you're allowing multiple attempts on the Typing Speed quiz, you can add different text for each attempt by clicking the Add New Item button. The system will randomize the text, giving learners a new passage each time they take the quiz.
For example: Attempt 1 -> Text A: "The quick brown fox jumps over the lazy dog." Attempt 2 -> Text B: "Pack my box with five dozen liquor jugs."
Editing a Typing Speed quiz:
Deleting a Typing Speed quiz:
Point Values and Cut Scores may be provided for each answer.
Additional answer options can be added by clicking on the Add new option button.
Click the Save button to save your changes.


Composed Essay: Learners can capture their reponse by typing their asnwer in the text box field below the question. This question type is associated with a scoring Rubric and is graded manually by an administrator / instructor.
Limited Correct
Limited Correct
Documents: view and manage any attachments uploaded to a contact record, either directly, or through a survey response, workflow case or their jobs candidate portfolio.
Addresses: view and manage home, work, shipping and billing addresses for the contact (note that home address fields can be populated by a survey response using the Respondant Attribute fields; the other addresses can be copied from the Employed By/Belongs To group on the Details tab, if that Employer group has them).
Comments: add and view comments regarding the contact (only visible to administrators with access to this screen, not visible to contacts with portal access only).
Under the Memberships tab:
Groups: view and manage all of the groups memberships a contact has, including their membership function and expiry.
Referrals: view and manage additional details about Employer relationships (contact Support to configure this for your organization).
People: view and manage hierarchical relationships to Managers, Supervisors and Validators for the contact.
Under the Records tab:
Gradebooks: view and manage any Gradebook progress for the contact.
Logbooks: view and manage any Logbooks and entries the contact has access to.
Registrations: view and manage any event registrations the contact has.
Achievements: view and manage any achievements that have been issued to the contact.
Survey: view and manage any survey responses started or submitted by the contact.
Under the System Access Tab:
Sign In: view and manage the contact's access to Shift iQ, such as:
grant or revoke access to the system
assign a contact to the correct Role(s) to ensure they can only access the screens they should (please advise Support when new Administrators are added to admin roles)
reset a contact's password manually, if required
impersonate a contact to see what they are seeing (contact Support to configure this for your organization if you don't see the Impersonate button on this screen)
view and manage a contact's Multi-Factor Authentication settings
archive a contact record that is no longer active in Shift iQ
Authentications: view the contact's login history, including which browser they used and from which IP address.
At the top of the page, click on Add New Class
On the Schedule a New Class page:
Select the Achievement that will be granted for this class (See Creating New Achievement if the required Achievement is not on the list).
Create a Class Title (The descriptive title for this class.)
Schedule the Class Start and End Date/Time (The start and end date and time for this class event.)
Add the Location of the Class by selecting the Venue (See if the required Venue is not on the list)
Add a Class Summary
Select Save
Note: A class can also be created by duplicating an existing class, or by uploading a JSON file.
On the Schedule a New Class page:
Below the New Class heading, select Duplicate copy of an existing class from the dropdown list.
Select the Class you want to duplicate.
Under Class Title, add the new title for the duplicated Class.
Select if you want to copy the Gradebook as well by selecting Yes or No below Copy Gradebook.
Update the Start and End Date/Time for the Class.
Select Save
On the Class Setup tab click on the Duplicate button.
Under Class Title, add the new title for the duplicated Class.
Select if you want to copy the Gradebook as well by selecting Yes or No below Copy Gradebook.
Update the Start and End Date/Time for the Class.
Select Save
From the Admin Home Screen select the Event Toolkit
Under the Classes heading, select the Classes counter.
Search for the existing Class that you want to download the *.JSON file for.
Under the Class Setup tab, click on the Download JSON button.
Select the Download button to start the download of the *.JSON file.
Once the file download is completed, click on Classes in the breadcrumb trail at the top of the page.
At the top of the page, click on Add New Class
On the Schedule a New Class page:
Below the New Class heading, select Upload one new class from a file from the dropdown list.
Next to the Select and Upload Class JSON File field, click on the magnifying glass icon and select the saved *.JSON file.
Click Save.
There are two easy ways to add an image to an assessment question:
1. Drag and Drop the Image
While creating or editing an assessment question, you can simply drag the image from your computer and drop it directly into the content field. It’s a quick and convenient way to add images without needing to navigate away from the page.
2. Upload Image to the Assessment Bank
Alternatively, you can upload the image to the Assessment Bank first. Once uploaded, you can easily select the image from the bank and attach it to the specific question. This method helps keep all your images organized in one place and provides you with additional management options, like tracking usage and image versions.
Note: The maximum size of an image that can be uploaded is 1 MB. If you require a bigger image to be uploaded, please contact your Shift iQ account representative.
How to Upload an Image to the Assessment Bank
When Sections as Tabs is enabled and Tab Navigation is disabled, you can set timers for individual sections (tabs) within the assessment form. This allows you to control the time learners can spend on different parts of the assessment.
There are the two options available for configuring timers:
Enable Timer for Some Tabs This option allows you to set a timer for specific tabs within the assessment form. It’s useful if you want to give learners a break in between sections, such as during an extended exam where you allow them time to rest or stretch their legs. If this option is selected, the Break Timer should only be enabled for the specific tabs where you want to add a timer (e.g., between sections). This could be a short break to allow learners to relax before continuing the assessment.
Enable Timer for All Tabs
In the Assessment Bank, click on the Attachments tab, then click the Add Attachment button.
Next to the File field, click on the magnifying glass icon and select the image you want to upload.
Options for the Image:
Title: You can edit the title of the image. This title will be visible to the user if they click on the image during their assessment attempt.
Condition: Choose from the following options:
Duplicate: If the image is a copy of an existing one.
Edit: If the image is a version that has been edited.
New: If the image is newly uploaded.
Purge: If the image is no longer needed and should be removed.
Surplus: If the image is extra or not in active use.
Unassigned: If the image hasn’t been assigned to any specific content yet.
Actual Dimensions: This shows the original size of the image.
Target Online Dimensions: Here, you can specify the size at which the image should display to the learner online.
Target Paper Dimensions: If you’re printing the assessment form for an exam, set the image size for its appearance in the printed version.
Palette: Specify the color scheme of the image (e.g., Color, Black and White).
This process helps ensure that the image is uploaded properly and formatted for different viewing scenarios.
Editing or Changing an Uploaded Image
Under the Attachments tab, click on the edit pencil icon next to the image's Asset number.
You can edit the following details:
Title
Condition
Target Online Dimensions
Target Paper Dimensions
Palette
if the incorrect image was uploaded, you can replace it by clicking on the magnifying glass icon next to the Replace with File field and selecting the correct image. Keep in mind that replacing the image will remove the original image that was uploaded.
Alternatively, you can create a new version of the image without losing the original by clicking the Arrow icon under the Current Version heading and then uploading the new image. This way, the original image will remain intact, and the new version will be added to the image history.
Deleting an Image
If the incorrect image was uploaded, you can delete it by clicking on the trash can icon next to the image's Asset number. After clicking the icon, you will be redirected to the Delete Confirmation page, where you will need to confirm if you want to proceed with the deletion. If there are multiple versions of the image, you will be prompted to choose whether you want to delete just the current version or all versions of the image.
Please Note: Deleting an image is a permanent change that cannot be undone. The image will be deleted from all forms, queries, and reports.
View the Image History
Any changes made to an image by an administrator are recorded in the system. To view the history of an image, click on the History icon below the image. This will display a record of who made changes and what changes were made.
Image Usage Report
Each image you upload into the system keeps a record of where it’s being used. Specifically, it tracks which questions the image appears in and the date when it was added. This allows you to easily see how and when the image is being utilized across assessments, helping you stay organized and keep track of your content efficiently.
Scan Images
The Scan Images button is designed to help manage and organize images associated with questions in a question bank. After migrating questions from an one bank to another, the image links associated with the questions might still point to the old bank, which can cause issues if those links are broken or if you need to update the images independently.
When clicking the Scan Images button:
You can quickly find any questions with image links that are still referencing the old bank.
If the image exists as an attachment in the new bank, it gets a green checkmark ().
If the image doesn’t exist as an attachment, it gets a red exclamation ().
Convert the image links to Attachments by clicking on the Add Attachments icon (). The images will be copied or migrated into the new Bank as an Assessment Attachment.
You will then be able to modify, update, or manage the images without impacting the old bank or its assets.
Please Note: When Enable Timer for All Tabs is selcted, then you are not able to add Accommodations for an exam.
Steps to Set Timers for Tabs
Go to the Specification tab and click on the edit pencil icon next to Form Limit.
Ensure that Sections as Tabs is enabled and make sure that Tab Navigation is disabled.
In the Tab Time Limit field, select one of the following:
Enable Timer for Some Tabs: Set timers for specific tabs where needed.
Enable Timer for All Tabs: Set time limits for each tab across the entire assessment.
Click Save to apply the changes.
Click on the Forms tab and select the form for which you enabled the Tab Time Limit.
Click on the Section tab.
Click on the edit pencil icon next to the Warning on Next Tab field, found under the Configuration heading.
In the Configuration card, configure the following settings:
Warning on Next Tab: Set a warning that notifies learners when time is running out for a specific section.
Break Timer: Enable the break timer for tabs where breaks are required.
Time Limit (minutes): Set the time limit for each individual tab.
Click the Save button.

Select the Contact toolkit on the Admin Home Page and select the Groups counter below the Contact Group heading.
Click on the Add New Group link at the top of the page to create new Group.
Provide basic details for the new group:
Add Group Name (Required): The name of the group should be unique and descriptive.
Choose Group Type (Department, District, Employer, List, Role, Team or Venue)(Required): Group type determines the features available for using and managing it in the system.
Add Group Tag (Optional): You can tag contact groups to make them easier to find.
Click Save
Additional fields that can be edited after Group has been created:
Description: Comment or note to describe the purpose of the group.
Group Code: Alphanumeric code that uniquely identifies this contact group.
Group Category: Classification or tag for this group
Group Status: The current status of this group.
After creating the Group Type: Employer, District or Venue, navigate to the Address panel in the group and add the Physical, Shipping and Billing Address (if required by Organization).
Click Save when address has been added.
In the Group, click on the People tab and then on the Add People button.
You can add people by searching for the people you want to add or in bulk by adding email addresses:
Searching for People: You can search for people to add to the group by Contact Name or Email. After searching for the person you want to add, click the checkbox next to the person's name and then click on the Add button. If there is more than one person in your search results that you want to add, you are able to select multiple checkboxes.
Bulk: Select By Email Address List from the dropdown list under the Add People to Group heading. Copy and paste the email addresses of users that you want to add to the group and click on the Add button.
Please note, these users need to already have a contact record in the system to be added to the group.
To allow User Self Registration, after creating the group, go into the Group and under the Group tab select the checkbox next to Allow users to subscribe/unsubscribe themslevles. By selecting the checkbox, the system adds a toggle for the group on the new user registration screen. Users are able to select the group when creating their new account on the
An Global Admin can create a link, to provide to Organizations, so if a user needs to select a Role during registration the Role will be pre-select when users create an account.
Example: https://Organization.insite.com/ui/lobby/register?group=GROUP NAME
Using InSite as an example:
Organization: insite | Group Name: Help Documentation
HINT: If you put in the group name as is, the system will replace each space with the characters %20. You can avoid this by using a + character instead of the spaces in your link. (GROUP+NAME / GROUP%20NAME)
URL: https://insite.insite.com/ui/lobby/register?group=Help+Documentation
On the New User registration page, the Help Documentation field will be preselected.
Timer Type: Choose if the timer should be Enforced or if it is Optional
If Enforced, then learner will not be able to navigate to the next tab until the timer runs out.
If Optional, then learner can choose to leave the break tab before the timer runs out.
Parent (Hierarchy) / Parent (Functional): You can select another group as the container for this contact group. This is optional, and it allows you to nest groups into subgroups.
Capacity: The maximum number of people permitted in this group.
Group Options: Automatically add new users to this group / Allow users to subscribe/unsubscribe themselves
Under the Registration tab, click on the Add Registration(s) button.
Select the Seat for the registrant, enter the Registration Fee amount, select Billing Customer and Employer if Employer or a third party is paying for the seat.
Select the user you want to add to the Class and click Add button.
Edit Registration
Click on the Pencil icon next to the users registration.
On the Edit Registration page, you are able to update the following information:
Hours Worked to Date (if required)
Approval status (The current status of the Participant at the time of this registration.)
Attendance status (The current status of this record in the registration process or workflow.)
Comments (Additional information that is specific to this registration.)
Seat
Registration Fee amount
Billing Customer
Employer
Click Save after changes were made to the users registration.
Download Reports
Reports available for Classes:
Registration Report (*.pdf / *.xlsx)
Detailed Registration Report (*.pdf / *.xlsx)
Attendee List (*.pdf / *.xlsx)
Scores Report (*.pdf / *.xlsx)
Most Improved Report (*.xlsx)
Under the Gradebooks tab in a Class, admins can create a New Gradebook by clicking on the New Gradebook button or select and existing Gradebook by clicking on the Find Gradebook button.
Create New Gradebook
Click on the New Gradebook button.
Create a Title for the new Gradebook, select Period (optional) and select the Achievement.
Choose if you want to include only Scores in the Gradebook or Standards (Compentencies) as well. If Standards is included, select the Competency Framework you want to attached to the Gradebook.
Select Save
Add Existing Gradebook
Click on the Find Gradebook button.
From the dropdown list, select the existing Gradebook you want to assign to the class.
Click on the Plus Icon next to the dropdown list.
You can remove the Gradebook from the Class by clicking on the Trash Can icon next to the Gradebook attached to the Class.
Under the Seats panel, select Add Seat
Add a Seat Name (title for the seat)
Add Seat Description
Set Seat Price
Free
Single Price
Multiple Price Levels (Example: members pay less than non-members)
Add the seat name in the Price Name field;
Add the seat cost in the Price Amount field;
Select the Group Status you are creating the seat for and click the Add Price button.
Choose whether Taxes apply for this seat.
Add Seat Agreement (Terms & Conditions that a users needs to Agree to before moving forward with class booking)
Select Save
Under the Content tab, you are able to add or edit the following Class details:
Title
Summary
Description
Materials
Instructions
Contact and Support
Accommodation
Additional
Cancellation and Refund
After a Class is created, the following information can be added or edited under the Class Setup tab:
Identification
Achievement: Achievement that contains the Program you want to evaluate with this class.
Event Title: The descriptive title for this class.
Event Identifier: A globally unique identifier for this class.
Source: The background source or external reference code for this class.
Schedule Information
Event Start: The start date and time for this class event.
Event End: The end date and time for this class Event.
Duration: Duration of this class event.
Publication
Status: The business process for managing classes has several steps; this is the current step in the process.
Registration Start: The date and time when registration for this event is open, after which new registrations are permitted.
Registration Deadline: The date and time when registration for this event is closed, after which no new registrations are permitted.
Location Information
Venue: The Venue where the class is taking place.
Attendance
Capacity: Set the capacity limit for the class. Enter the Minimal Capacity (Optional) and Maximum Capacity number of registrants required to attend a class. If there is no minimum number of registrants required, you can leave the Minimal Capacity section blank and only add the maximum number of registrants that can attend the class.
Waitlisting: Enable or Disable the ability to allow Waitlisting for a class.
Contacts
Instructors: Add instructors for the Class by clicking on the Assign Instructors button.
Search for the Instructors by Name, Email or Group.
Select if you want to:
Create the One new gradebook
Create a Title for the Gradebook.
The Class you are creating the Gradebook in wil automatically be assigned to the new Gradebook.
Set Period if required.
Assign the Achievement to the Gradebook
Select Save
Duplicate copy af an existing gradebook
Select the Gradebook you want to duplicate.
Create a Title for the Gradebook.
The Class you are creating the Gradebook in wil automatically be assigned to the new Gradebook.
Upload one new gradebook from file
Selct the *.json file of the Gradebook you want to upload.
Select Save
Click on the Find Gradebook button.
From the dropdown list, select the Gradebook you want to attach to the Class.
Click the Plus icon () to add the Gradebook
You can remove the Gradebook from the Class by clicking on the Trash Can icon next to the Gradebook attached to the Class. Note: Once users in a Class as been added to the Gradebook, and they have Scores in the Gradebook, you are not able to remove the Gradebook from the Class.
Repeat the above steps to create all the required seats for the Class.
Registration Completion
Credit Hours: The number of credit hours associated with completion of the class.
Set Period if required.
Assign the Achievement to the Gradebook
Select Save