Upload Contacts
This feature is generally used to upload multiple NEW contacts records into your Contact toolkit. Use with Caution if you want to update exisiting Contact records. If any of the information in your upload spreadsheet does not match the information on a record in the system for that unique login name/email address, it will overwrite the existing information. For example, if the name in the system for user "[email protected]" is Robert Doe and the spreadsheet says Bob Doe, Bob will overwrite Robert.
To bulk upload contacts:
Create a CSV UTF-8 (comma delimited) (.csv) file with at least the first name, last name and email address of the contacts you want to add. You can upload additional information as well, if desired, such as addresses, phone numbers, account numbers, etc., and you can save an existing Excel or other spreadsheet as a CSV UTF-8 file as well. Make sure your columns have header names that can be mapped to the upload screen.

Go into Contacts toolkit and below the People counter, select Upload Contact People.
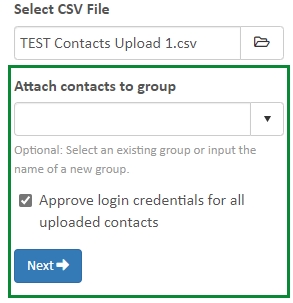
Select the CSV UTF-8 (comma delimited) (.csv) file with the contact details of the users you would like to add. Your upload file must be a spreadsheet saved as a CSV UTF-8 (comma delimited) (.csv) file.
Optional: the contacts you are uploading can all be attached to a specific group if desired. Select an existing group or input the name of a new group.

If you want all the uploaded users to have system access, check the box Approve login credentials for all uploaded contacts. They will then be able to sign in to the system with the same permissions as the group listed in step 4. If no group is chosen, they will only have portal access and any portal tiles that have no privacy settings turned on. Note that uploaded contacts do not automatically receive a welcome email informing them of their temporary initial password.
Click Next
Choose the fields into which you want to upload your contact data.
Required Fields:
Unique Identifier Type (usually LoginName)
Unique Identifier (usually Email, must be unique in the upload file)
Login Name (usually Email, must be unique in the upload file)
First Name
LastName
Email
Map additional column names (addresses, phone numbers, account numbers, etc.) in your CSV UTF-8 (comma delimited) (.csv) spreadsheet to the desired fields in the Upload Contacts form.
Select Upload and Save Changes. If there are any duplicate email addresses in your upload spreadsheet, or if an email address is already in use in our system for a user in another tenant account, you will get error messages. Update or remove those records from your CSV UTF-8 (comma delimited) (.csv) spreadsheet, save and close it, and repeat steps 3-7. If there are no errors, the upload will proceed, and when finished will display the first 3 and last 3 records uploaded/updated from the spreadsheet.
Last updated
Was this helpful?