Create a New Group and Adding People to the Group
Create a New Group
Select the Contact toolkit on the Admin Home Page and select the Groups counter below the Contact Group heading.
Click on the Add New Group link at the top of the page to create new Group.
Provide basic details for the new group:
Add Group Name (Required): The name of the group should be unique and descriptive.
Choose Group Type (Department, District, Employer, List, Role, Team or Venue)(Required): Group type determines the features available for using and managing it in the system.
Add Group Tag (Optional): You can tag contact groups to make them easier to find.
Click Save
Additional fields that can be edited after Group has been created:
Description: Comment or note to describe the purpose of the group.
Group Code: Alphanumeric code that uniquely identifies this contact group.
Group Category: Classification or tag for this group
Group Status: The current status of this group.
Parent (Hierarchy) / Parent (Functional): You can select another group as the container for this contact group. This is optional, and it allows you to nest groups into subgroups.
Capacity: The maximum number of people permitted in this group.
Group Options: Automatically add new users to this group / Allow users to subscribe/unsubscribe themselves
After creating the Group Type: Employer, District or Venue, navigate to the Address panel in the group and add the Physical, Shipping and Billing Address (if required by Organization).
Click Save when address has been added.
Adding People to a Group
In the Group, click on the People tab and then on the Add People button.
You can add people by searching for the people you want to add or in bulk by adding email addresses:
Searching for People: You can search for people to add to the group by Contact Name or Email. After searching for the person you want to add, click the checkbox next to the person's name and then click on the Add button. If there is more than one person in your search results that you want to add, you are able to select multiple checkboxes.
Bulk: Select By Email Address List from the dropdown list under the Add People to Group heading. Copy and paste the email addresses of users that you want to add to the group and click on the Add button.
Please note, these users need to already have a contact record in the system to be added to the group.
Allow User Self-Registration
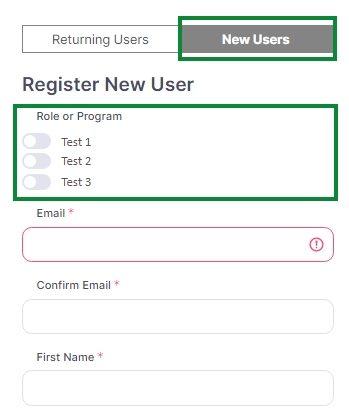
To allow User Self Registration, after creating the group, go into the Group and under the Group tab select the checkbox next to Allow users to subscribe/unsubscribe themslevles. By selecting the checkbox, the system adds a toggle for the group on the new user registration screen. Users are able to select the group when creating their new account on the New User registration page.

How to Create a link for New User Registration page with slider pre-selected
An Global Admin can create a link, to provide to Organizations, so if a user needs to select a Role during registration the Role will be pre-select when users create an account.
Example: https://Organization.insite.com/ui/lobby/register?group=GROUP NAME
Using InSite as an example:
Organization: insite | Group Name: Help Documentation
HINT: If you put in the group name as is, the system will replace each space with the characters %20. You can avoid this by using a + character instead of the spaces in your link. (GROUP+NAME / GROUP%20NAME)
URL: https://insite.insite.com/ui/lobby/register?group=Help+Documentation
On the New User registration page, the Help Documentation field will be preselected.
Last updated
Was this helpful?